Original articles & blog content. Written, illustrated and published, on auto-pilot.
Our Content Engine learns your business, writes articles in your voice with custom images, and publishes them to your WordPress site on a schedule you set. Your blog stays active and Google keeps noticing, without you writing a word. Try the whole system with 3 free articles: no card, no commitment.

Try it free: 3 articles, written for your business
Enter your web address and email. We analyse your site, find the topics your customers search for, and write your first articles free.
Your blog pipeline at a glance
Runway, cadence, credits, what's scheduled, everything in one place. No spreadsheets, no calendars, no chasing freelancers.
Buy credits as you go, or subscribe for full autopilot
Either way, you get the same volume discounts and the same article quality. The choice is whether you want a monthly rhythm we manage for you, or to top up as the mood takes you.
Buy credits when you want them
Top up your balance whenever, spend the credits however. No monthly commitment, no auto-renewal, no surprises.
- Buy in bulk, get a deeper discount. Same tier ladder as subscriptions.
- Credits never expire. Spend them next week or next year.
- Buy 1 to 100 credits at a time. From £5 down to £1.75 each.
- Switch on Auto mode any time, your credits power it just the same.
Pick a monthly volume, we do the rest
Choose how many articles you want each month. We top up your credits at every renewal and Auto mode publishes them to your site on the cadence you chose, without you lifting a finger.
- Full hands-off Auto mode runs on your subscription credits.
- Higher volumes get bigger discounts, same ladder as pay-as-you-go.
- Adjust your monthly quantity any time, Stripe prorates fairly.
- Unspent credits roll over. No "use it or lose it" each month.
6 Reasons You Need Fresh Content, Now More Than Ever!
Google has changed. AI search has changed everything else. A dead blog doesn't just stagnate any more, it actively costs you visibility. Here's why posting regularly on your website is no longer optional!
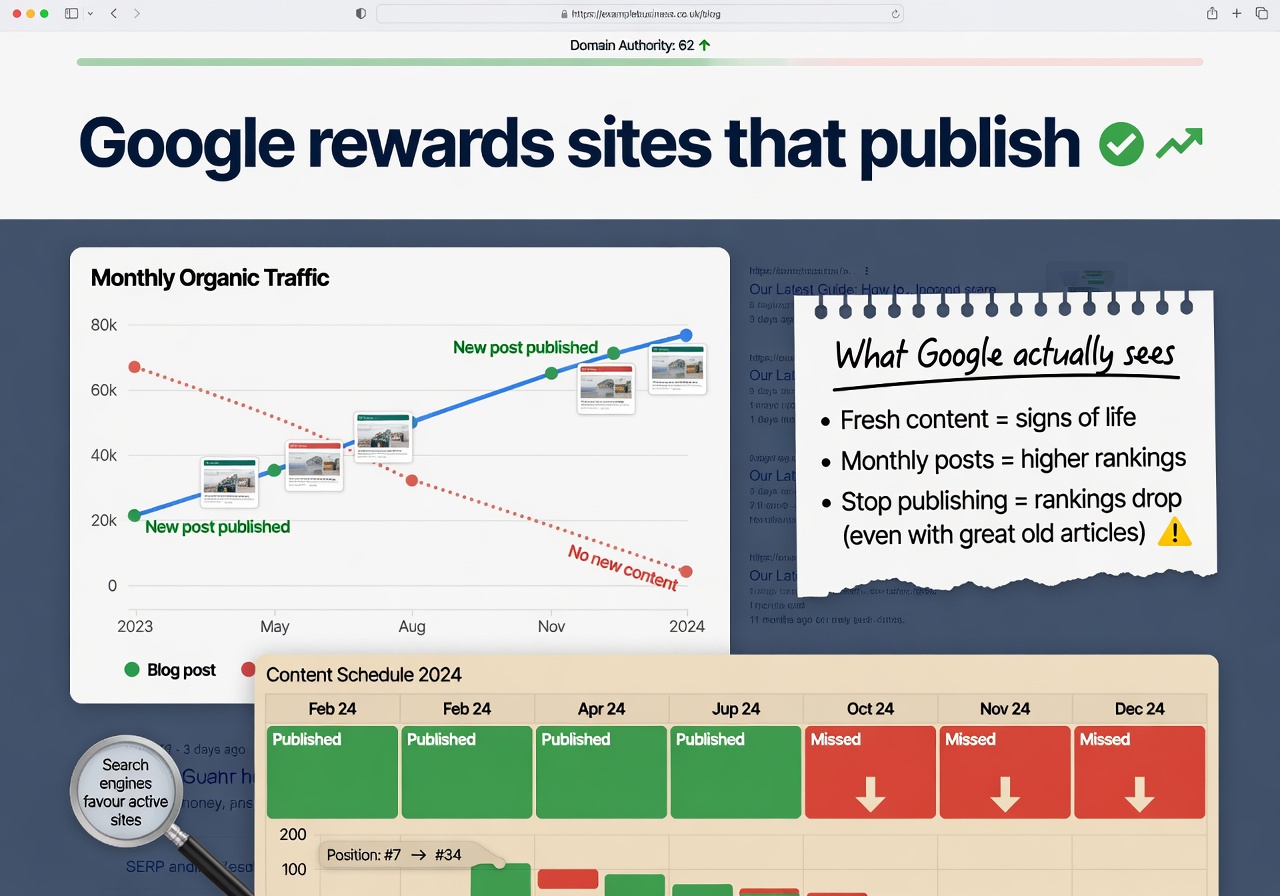
Google rewards sites that publish
Search engines have always favoured sites that show signs of life. Sites publishing original content monthly consistently out-rank otherwise-identical sites that don't. Stop publishing and you slide down the rankings, even if your old posts were great.
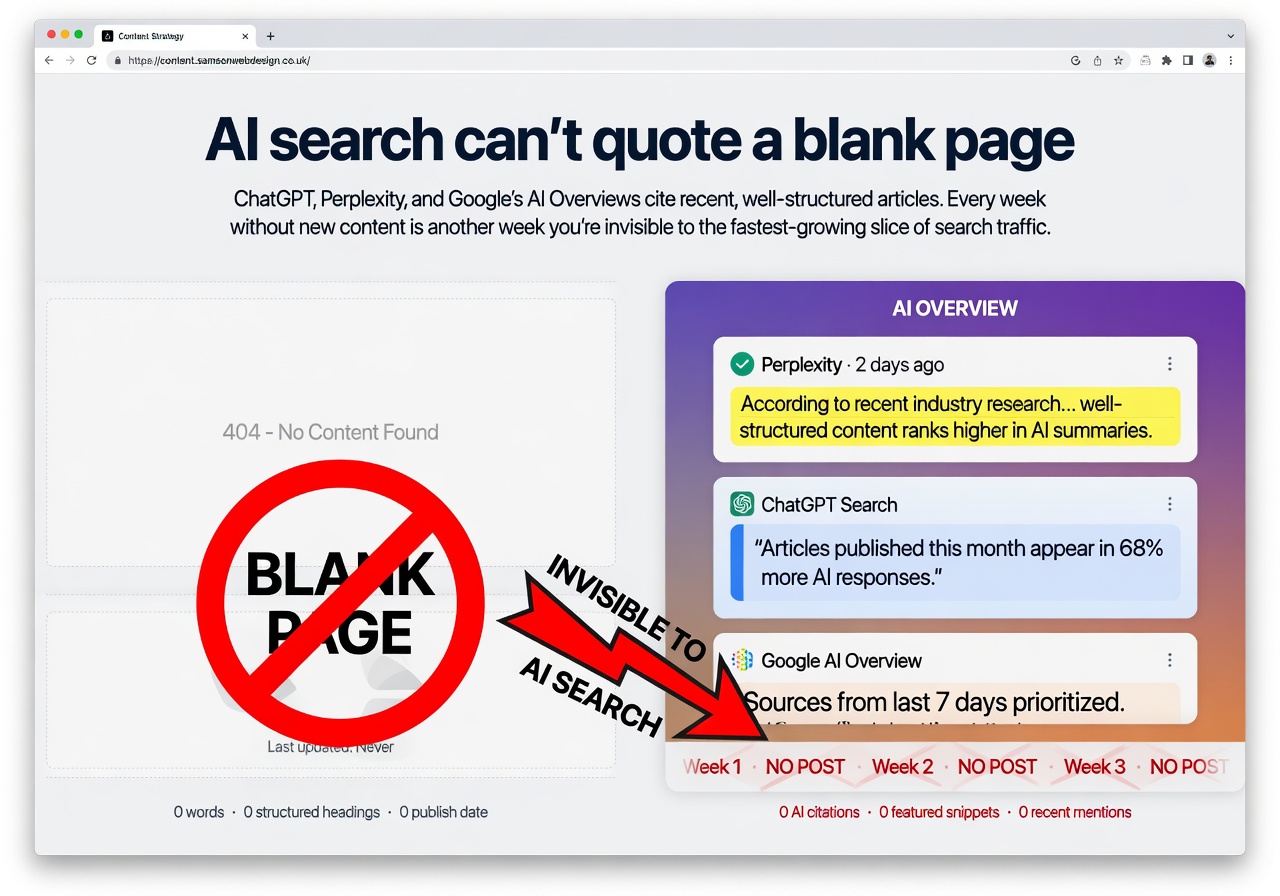
AI search can't quote a blank page
ChatGPT, Perplexity, Google's AI Overviews, all of them cite recent, well-structured articles. Every week without new content is another week you're invisible to the fastest-growing slice of search traffic.
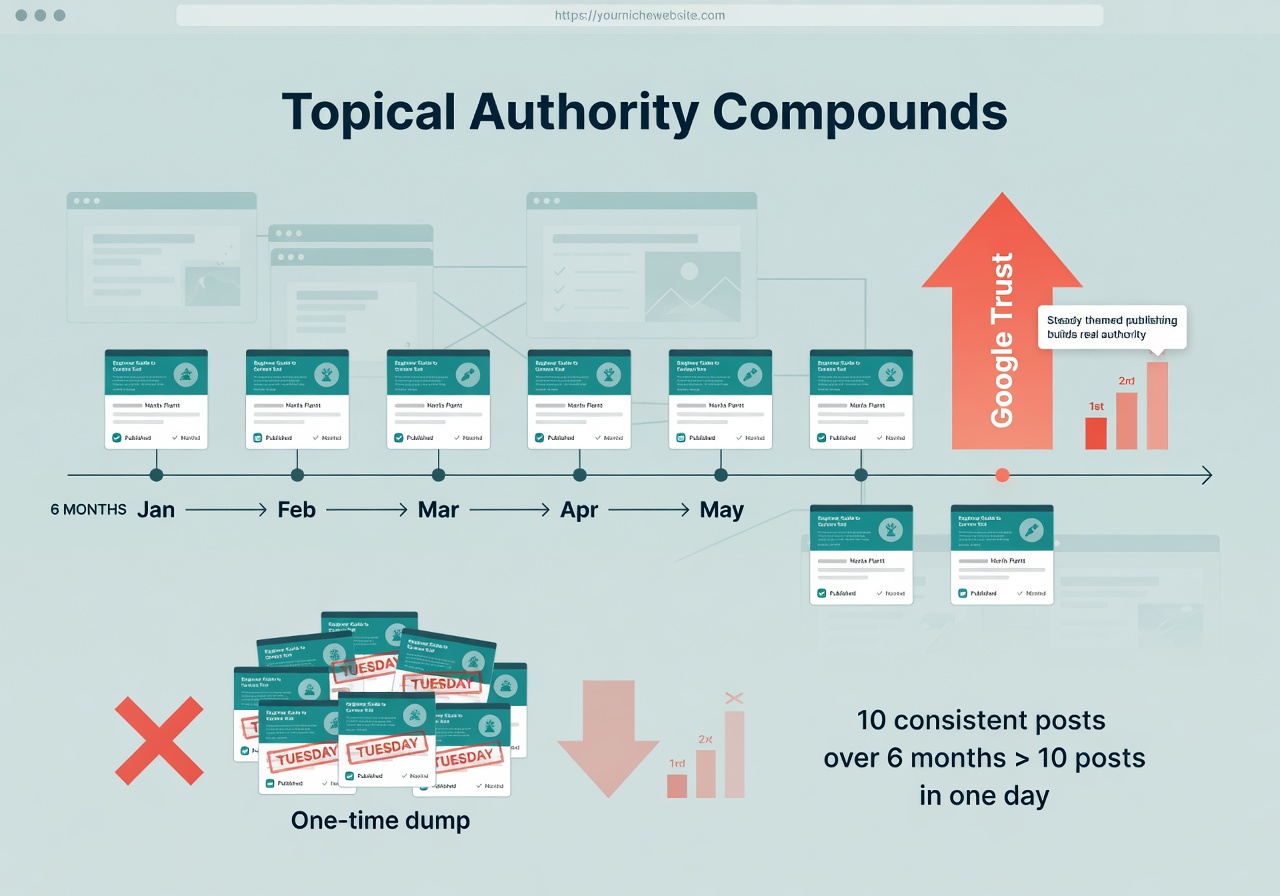
Topical authority compounds
Google trusts sites that consistently cover a niche. Ten posts on related topics over six months outperform ten posts dumped on one Tuesday. Steady, themed publishing is how you build real authority.
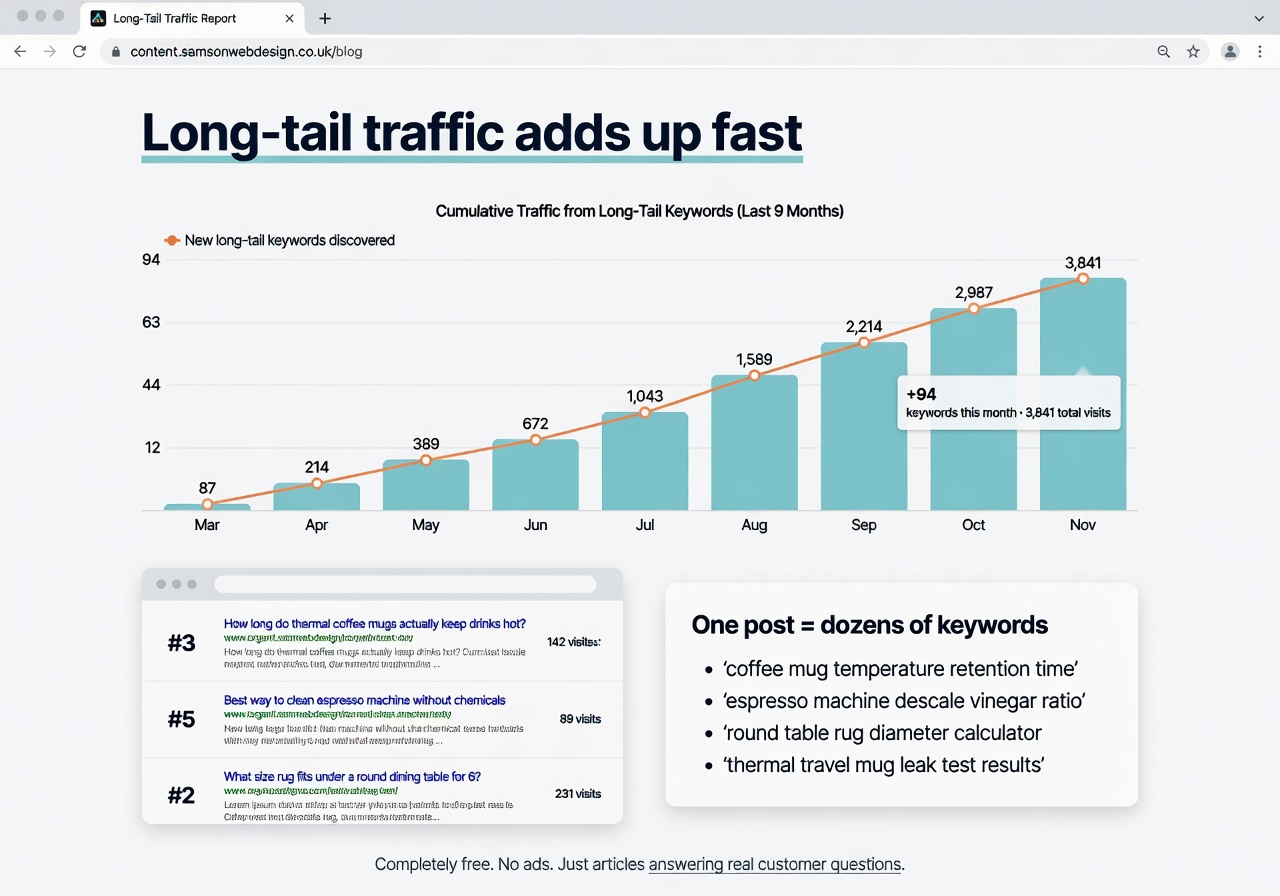
Long-tail traffic adds up fast
Every article ranks for keywords you'd never think to target, the specific questions your customers type into Google. One post can pull in dozens of search terms over time, completely free.
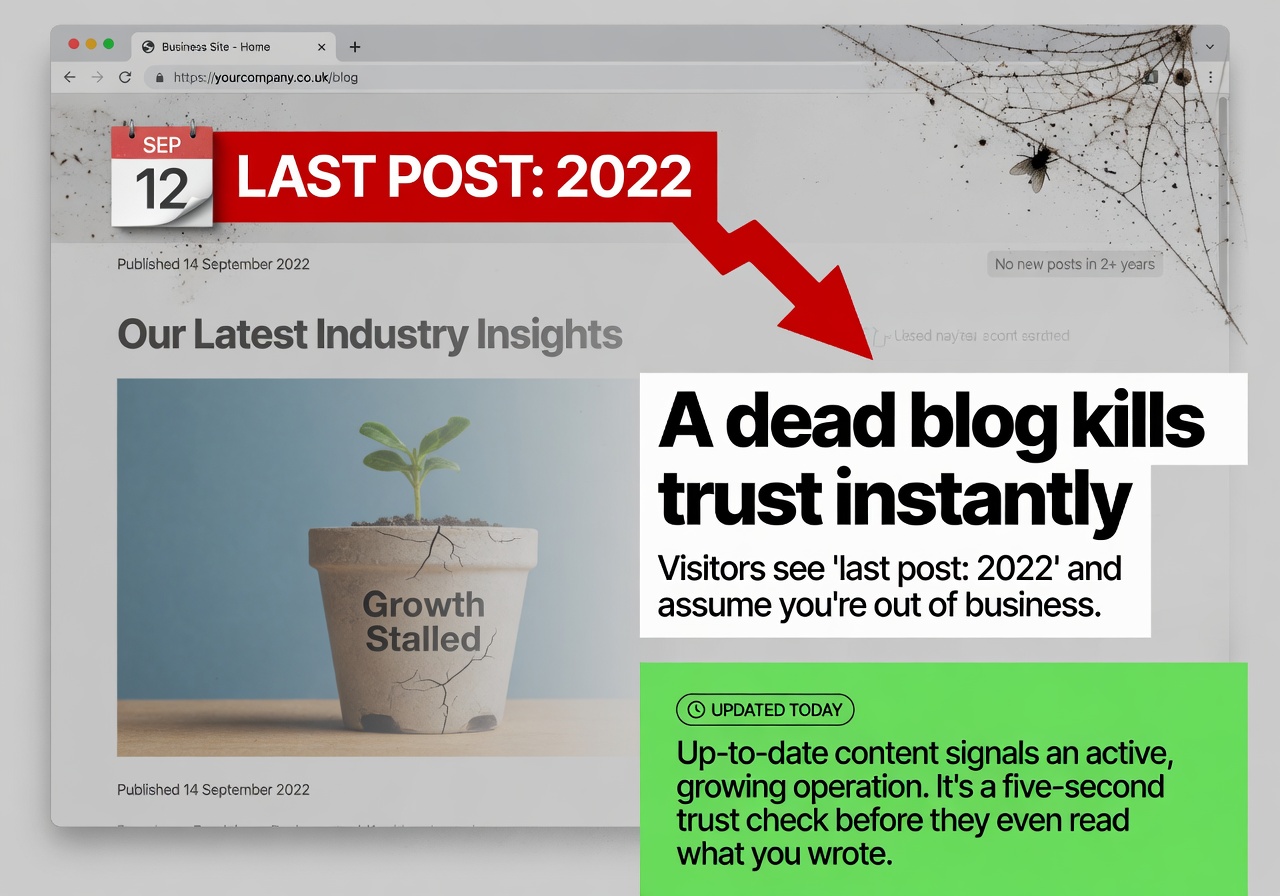
A dead blog kills trust instantly
Visitors see "last post: 2022" and assume you're out of business. Up-to-date content signals an active, growing operation. It's a five-second trust check before they even read what you wrote.
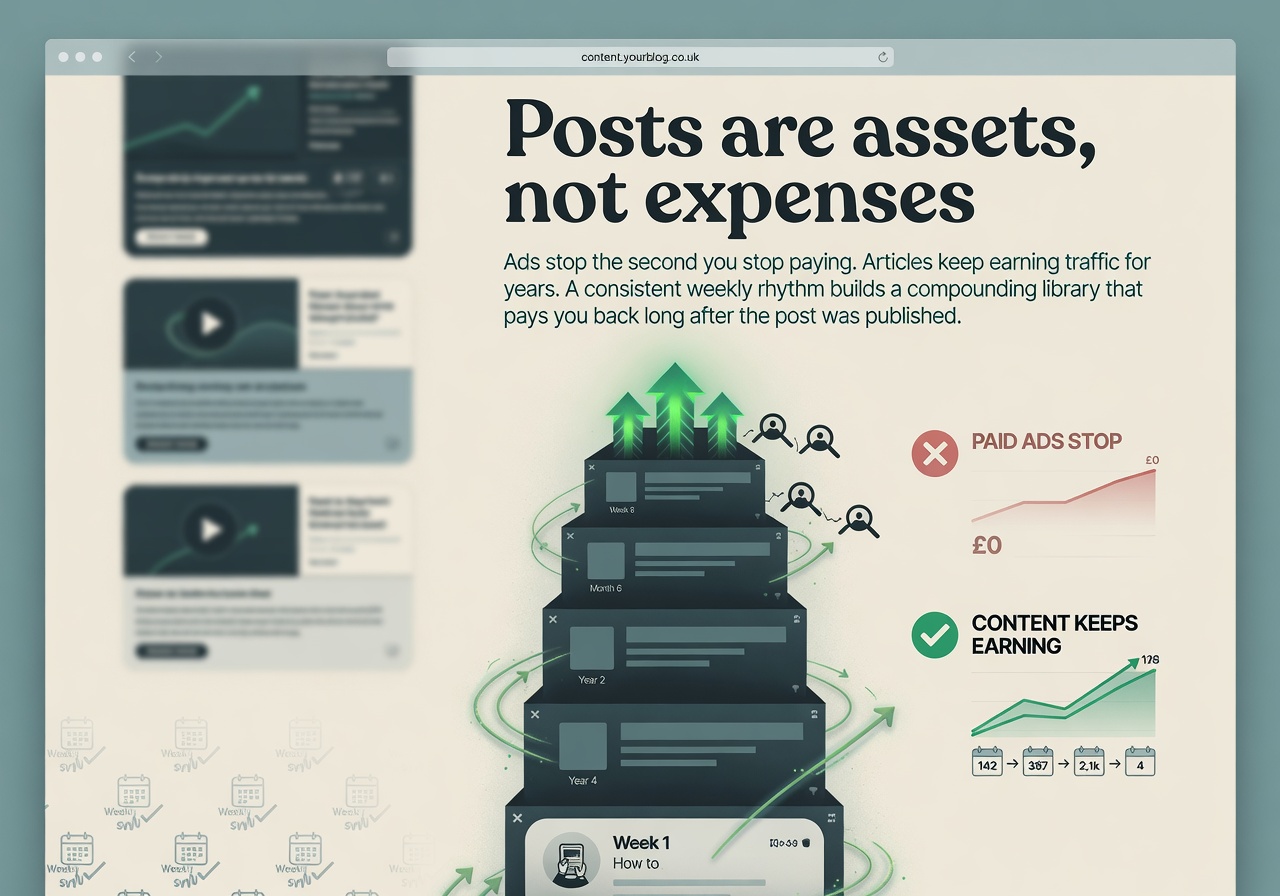
Posts are assets, not expenses
Ads stop the second you stop paying. Articles keep earning traffic for years. A consistent weekly rhythm builds a compounding library that pays you back long after the post was published.
Search engines have always favoured sites that show signs of life. Sites publishing original content monthly consistently out-rank otherwise-identical sites that don't. Stop publishing and you slide down the rankings, even if your old posts were great.
ChatGPT, Perplexity, Google's AI Overviews, all of them cite recent, well-structured articles. Every week without new content is another week you're invisible to the fastest-growing slice of search traffic.
Google trusts sites that consistently cover a niche. Ten posts on related topics over six months outperform ten posts dumped on one Tuesday. Steady, themed publishing is how you build real authority.
Every article ranks for keywords you'd never think to target, the specific questions your customers type into Google. One post can pull in dozens of search terms over time, completely free.
Visitors see "last post: 2022" and assume you're out of business. Up-to-date content signals an active, growing operation. It's a five-second trust check before they even read what you wrote.
Ads stop the second you stop paying. Articles keep earning traffic for years. A consistent weekly rhythm builds a compounding library that pays you back long after the post was published.
Try it without paying a penny
3 fully-written articles, in your voice, on us. See if it's worth it before you spend anything. No card, no commitment, no obligation.
Real articles written and published by Content Engine
A live sample of articles the Content Engine has written and pushed to customer sites. Click any of them to read the full article and judge the quality before you sign up.

Affordable Website Development: Finding the Right Fit for Your UK Small Business
Getting a decent website used to mean handing over a small fortune. That's no longer true. In 2026, UK small businesses can go live for as little as £10 a month, or invest in something bespoke without spending tens of thousands. The hard part isn't finding an option. It's knowing which option suits your situation.
This guide breaks down the four main routes: DIY website builders, templates via platforms like Shopify or Squarespace, freelancers, and full-service agencies. Each has a real use case, real trade-offs, and a type of business that fits it well.
DIY Website Builders: Fast, Cheap, and Sometimes Good Enough
Platforms like Wix, Squarespace, and Shopify let you build a site yourself, usually for between £10 and £40 per month. Wix is widely considered the strongest all-rounder for UK small businesses, offering a drag-and-drop editor, app integrations, and decent SEO tools without needing any technical knowledge. Squarespace tends to suit creative businesses and portfolios. Shopify is the go-to for anyone selling products online.
These platforms handle hosting, security updates, and backups automatically. That's a genuine benefit for sole traders and startups with no IT support. The monthly cost is predictable, which also makes budgeting straightforward.
The catch is that you're doing the work yourself, and most templates look like templates. If you want something that stands out, reflects your brand properly, or converts visitors into enquiries, a DIY build often falls short. You also don't own the platform. If Wix changes its pricing or discontinues a feature, you're at their mercy.
Who Should Go the DIY Route
DIY builders work best for businesses that:
- Are just starting out and need a credible web presence quickly
- Have a tight launch budget (under £500)
- Sell a small number of products online and don't need complex integrations
- Have someone in-house willing to manage and update the site regularly
If you're a freelance photographer, a local yoga instructor, or a startup testing a new idea, a well-configured Wix or Squarespace site is a perfectly sensible starting point. Just don't expect it to compete with a professionally built site in search results or to handle complicated business logic.
Freelancers: More Custom, Still Affordable
A skilled freelance web designer can build something genuinely tailored to your business, usually for between £800 and £3,000 for a five to ten page site. That's a significant jump from the DIY route, but what you get in return is a proper brief, a design that matches your brand, and someone who thinks about user experience rather than just dragging boxes around.
Freelancers are particularly good value for small service businesses, tradespeople, and local companies that need something polished but don't have the budget for an agency. Many freelancers also offer monthly maintenance retainers, which gives you ongoing support without committing to a large agency contract.
The risk with freelancers is reliability. If your developer disappears, gets ill, or moves on to other work, you can be left without support for a site you don't fully understand. Always ask about handover documentation, who hosts the site, and what happens if you need changes down the line. A good freelancer will have clear answers to all of these.
Agencies: Higher Cost, Broader Capability
A web design agency brings a team to the table: designers, developers, copywriters, and often SEO or PPC specialists. For UK small businesses, agency pricing typically starts around £2,500 for a basic bespoke site and can rise well beyond £10,000 for e-commerce builds with custom functionality.
That sounds steep, but the value calculation changes when you factor in what you're getting. An agency doesn't just build a site, it builds a site that's structured to rank in search results, loads quickly, converts visitors, and grows with your business. You're also not relying on a single person. If your project manager leaves, the agency continues.
Agencies also tend to offer ongoing support packages covering hosting, updates, security monitoring, and performance reviews. For a business that generates real revenue from its website, that continuity is worth paying for.
What Actually Determines Cost
Whether you're looking at a freelancer or an agency, a few factors have the biggest impact on final price:
- Number of pages: A five-page service site costs far less than a 50-page site with blog, contact forms, and multiple service categories.
- E-commerce requirements: Adding a shop, payment gateway, stock management, and delivery logic adds complexity and cost.
- Custom design vs. template: Starting from scratch costs more than adapting an existing framework, though the results are usually stronger.
- Integrations: CRM systems, booking tools, and third-party APIs all take extra time to connect properly.
- Ongoing support: Monthly maintenance, hosting, and SEO services add to the running cost but are often essential for businesses that can't manage updates themselves.
Hidden Costs Worth Watching For
Whichever route you take, watch out for costs that don't always appear in the headline price. Domain registration, SSL certificates, professional email addresses, premium plugins, and stock photography can all add up. With DIY builders, the basic plan rarely includes everything you actually need, so you tend to end up on a higher tier anyway.
With agencies and freelancers, make sure your quote covers content migration if you're moving from an existing site, and ask who owns the finished code and design files. You should always walk away with full ownership of your site.
A Simple Way to Think About It
Rather than asking what's cheapest, ask what you need the site to do. A window cleaner who wants a basic page with a phone number and a contact form has very different requirements to a kitchen company running Google Ads and booking consultations online.
For most UK small businesses at the earlier stages, a decent freelancer or a small specialist agency hits the sweet spot. You get something that looks professional, works properly on mobile, and doesn't embarrass you when a potential customer searches your name. As your business grows, so can your site.
The cheapest option isn't always the most affordable one in the long run. A poorly built site that drives no enquiries costs you far more than a well-built one that pays for itself within a few months.

What Makes an Award-Winning Pool Enclosure? Lessons from the Industry's Top Competitions
Pool design awards have become a serious benchmark for the industry. Competitions like the Pool and Spa News Masters of Design Awards and the PHTA Awards of Excellence (both with 2026 submission deadlines of June 1) attract entries from across the residential pool and spa sector, judging everything from structural ambition to the finishing detail on a coping stone. For anyone investing in a pool enclosure, understanding what judges reward is genuinely useful, not because you necessarily plan to enter a competition, but because those criteria map almost exactly onto what makes a great installation in practice.
Engineering That Earns Its Place
The first thing award judges look at is structural integrity and engineering logic. An enclosure that looks beautiful but relies on bulky supports, awkward spans, or intrusive steelwork will not score well, regardless of how the render looks in photographs. Judges want to see a design that solves real problems elegantly.
For aluminium enclosure systems specifically, this means profiles that are as slender as structural requirements allow, glazing that maximises natural light without thermal compromise, and hardware that works smoothly year after year. Patented connection systems and tested load ratings are not just marketing points, they are exactly the kind of technical evidence that supports an award submission and, more importantly, gives homeowners genuine confidence.
The best enclosures make the engineering disappear. Guests notice the pool, the light, and the view. They do not notice the frame unless they look for it.
Aesthetic Coherence with the Wider Property
Judges consistently flag projects where the enclosure feels like an afterthought, bolted on to a pool that was designed without it in mind. Award-winning installations treat the enclosure as a fundamental part of the architectural vision from the start.
That means considering:
- How the profile colour and finish relate to the house facade
- Whether the roofline of the enclosure echoes or deliberately contrasts with adjacent structures
- How internal lighting interacts with the glazing panels after dark
- The transition between the enclosed pool area and any open terrace or garden beyond
A low-profile enclosure in anthracite grey sitting against a contemporary render finish reads very differently to the same structure in white beside a period stone property. Neither is wrong, but the choice has to be intentional and well-executed. Judges are looking for evidence that someone thought carefully about all of it.
Year-Round Usability as a Design Goal
One of the most compelling stories a pool project can tell a judging panel is that it genuinely extends how people use their outdoor space. This is where enclosures have a particular advantage over open-air pools, but only if the design actively enables that usability rather than simply providing a roof.
Ventilation matters enormously here. An enclosure that traps heat and humidity in August or fogs up in November is not truly year-round capable, whatever the brochure claims. Award-worthy systems include carefully positioned ventilation panels, roof opening sections, or sliding wall segments that allow the environment inside to be adjusted for the season without dismantling the structure.
Heating integration is equally important. Projects that pair the enclosure with solar thermal panels, heat pumps, or integrated underfloor systems demonstrate that the designer thought about the whole energy picture, not just the aesthetics. That kind of holistic thinking is exactly what premium competitions reward.
The Customer Experience Dimension
Judges for competitions like the Masters of Design often ask applicants to describe the client brief and how the final project delivered against it. This is not just box-ticking. It reflects a genuine belief that great design solves a real human problem for a specific person or family.
For enclosures, the customer experience story often centres on something straightforward: a family that previously got six weeks of use from their pool now swims from March to November. A homeowner who was reluctant to invest in a pool at all because of the UK climate now considers it the best decision they made. A commercial operator who can offer pool access as a genuine year-round facility rather than a seasonal amenity.
Those narratives are powerful in a submission and they are also, frankly, the point of the product. If an enclosure is not changing how people interact with their pool, something has gone wrong with the brief, the design, or both.
Detail and Finish: Where Good Becomes Exceptional
At the shortlist stage, judges often find themselves choosing between projects that are all technically competent and broadly attractive. The differentiator at that level is almost always the quality of the detail work.
In enclosure terms, that means:
- Clean, flush gasket lines with no visible sealant smears
- Drainage channels that work invisibly rather than being functional but ugly
- Door and sliding panel operation that feels precise and effortless
- Consistent colour matching across all components, including any bespoke sections
- Planting or landscaping that has been considered alongside the structure, not added afterwards
Photography matters too, in ways that are easy to overlook. Judges assess projects through images, and a beautifully detailed installation can lose marks simply because the submission photos were taken at the wrong time of day or from angles that do not show the relationship between the enclosure and the wider garden. If you are considering an award entry, commission a professional architectural photographer, and shoot at dusk as well as in daylight.
What This Means for Your Own Project
You do not need to be entering a competition to benefit from thinking like a judge. The criteria that win awards are the same criteria that produce enclosures owners are genuinely proud of after ten years, not just ten months.
Start with the brief. Be specific about how you want to use the space, what months matter most, and how the enclosure should relate to your house and garden. Work with a manufacturer whose engineering credentials are transparent and whose installation process includes proper quality checks at each stage. Sweat the details on finish and hardware. And think about the story the finished project will tell: does it solve the problem it was supposed to solve, beautifully?
That is what award judges are looking for. It is also, in the end, what makes a pool enclosure worth having.

Choosing the Right Website Builder: A Practical Guide for UK Small Business Owners
There are dozens of website builders out there, and every one of them claims to be perfect for small businesses. The reality is more nuanced. The right platform for a local plumber in Worthing looks very different from the right platform for a growing online clothing retailer in Manchester. Getting this choice wrong costs you time, money, and often a complete rebuild a year down the line.
This guide walks you through a clear decision process so you can pick the tool that actually fits your business, not just the one with the best marketing.
Start With Your Budget (Be Honest About It)
Before you look at features, nail down what you can realistically spend each month. Most website builder pricing has two layers: the platform subscription and the extras that pile on top.
Here is what realistic monthly costs look like in 2026:
- Free or near-free tiers: Wix and WordPress.com both offer free plans, but they come with the platform's branding on your domain, which looks unprofessional to customers.
- Entry level (around £10-£20/month): Enough to get a clean, branded site on Wix, Squarespace, or WordPress.com without major restrictions.
- E-commerce ready (£25-£60/month): Shopify's core plans sit here, as do Squarespace's Commerce tiers and Wix's Business plans.
- Growth and scale (£60+/month): Advanced Shopify, Wix Enterprise, or moving to a self-hosted WordPress setup with premium hosting.
Factor in your domain name (typically £10-£15 per year), any premium themes, and paid apps or plugins. A Shopify store with five apps can quietly creep from £29 to £80 a month before you have noticed.
Be Realistic About Your Technical Skill Level
Website builders exist on a spectrum from fully visual drag-and-drop to code-optional tools that reward people who know their way around HTML and CSS. Placing yourself honestly on that spectrum saves a lot of frustration.
If you want to build the site yourself with minimal technical knowledge, Wix is genuinely the most forgiving option. Its editor is visual and immediate, and it covers the majority of small business use cases well. Squarespace is slightly more structured but produces cleaner-looking results out of the box and suits businesses where design matters, such as photographers, studios, or consultancies.
If you are comfortable following tutorials and do not mind a learning curve, WordPress.com (or self-hosted WordPress.org) gives you far more control and flexibility. It powers roughly 43% of all websites globally, which means there is a solution to almost every problem somewhere in the community. The trade-off is that you need to manage updates, plugins, and occasionally troubleshoot things yourself.
Webflow sits at the more technical end of the DIY spectrum. It is excellent for custom designs but expects you to understand layout concepts. Unless you have a background in design or development, it is probably overkill for a small business site.
Think About What Your Site Actually Needs to Do
A website builder that is great for a portfolio is not necessarily great for selling products. Map out your core requirements before you compare platforms.
Ask yourself:
- Do I need to take online payments, or just display products and take enquiries?
- Will I be running a blog to attract search traffic?
- Do I need booking or appointment functionality?
- Will I be managing the content myself on a regular basis?
- Do I need to connect the site to tools like Mailchimp, a CRM, or accounting software?
For straightforward service businesses (trades, consultants, local shops without online sales), Wix or Squarespace covers everything comfortably. For anyone planning to sell products online at any real volume, Shopify is worth the extra cost. Its checkout, inventory management, and payment processing are purpose-built for e-commerce in a way that the others simply are not.
Consider Your Growth Plans
The cheapest option now can become the most expensive option later if it forces a rebuild. Think 18-24 months ahead.
If you expect to grow from 10 products to 500, or from a local audience to a national one, you want a platform that scales without charging you at every step. Shopify handles high-volume e-commerce well. WordPress, particularly self-hosted with WooCommerce, gives you the most flexibility for complex growth scenarios because you own your setup completely.
Wix and Squarespace are excellent for small to medium-sized businesses, but both have ceilings. Very large product catalogues, complex membership systems, or highly customised functionality can strain them. If those are on your horizon, factor that in now.
Do Not Underestimate Support
When something breaks or you cannot figure out how to do something, where do you turn? This matters far more than most people expect when they are setting up.
Wix and Squarespace both offer 24/7 customer support, which is genuinely useful for non-technical business owners. Shopify's support is well-regarded and has live chat. WordPress is supported by a huge community of forums, documentation, and developers, but there is no single help desk to call, so you either need to know someone or be comfortable searching for answers.
If you would rather hand the whole thing to a professional and focus on running your business, a web design agency builds on these same platforms (or bespoke code) and handles everything from setup to ongoing changes. For many small business owners, that is the right call, particularly when the site needs to work hard from day one.
A Simple Decision Framework
Use this as a quick reference:
- Service business, DIY, low budget: Start with Wix on a Core or Business plan.
- Design-led business (studio, photographer, consultant): Squarespace gives you a polished result without much effort.
- E-commerce from the start: Shopify, even if you only have a handful of products. It grows with you.
- Blog-heavy or content-driven site: WordPress.com, or self-hosted WordPress if you want full control.
- Complex requirements or no time to manage it yourself: Work with a web design professional who can recommend and build the right setup for your specific needs.
One Final Thing to Remember
No platform is perfect. Every one of them has limitations and trade-offs. The goal is not to find the flawless tool. It is to find the one that fits your business right now, with enough room to grow, at a price that does not hurt.
If you are still unsure after working through this, talking to a local web design agency costs nothing upfront and can save you from an expensive wrong turn. The best website for your business is the one that brings in customers. Everything else is secondary.

The Long-Term Investment Case for Home Pools: Why Durability and Warranty Matter
Buying a swimming pool is not like buying a hot tub or a garden room. It is a permanent fixture, embedded in the fabric of your home, and it will shape how your family uses that home for decades. The question is not simply whether a pool is a good idea. The question is whether the pool you choose will still be performing reliably in 20, 30, or even 40 years.
That is where durability and warranty become central to the financial argument, not just the technical one.
The Real Cost of a Pool That Does Not Last
Many homeowners approach pool buying by comparing upfront prices. That is understandable, but it misses the point. A pool purchased at a lower entry cost that requires shell replacement, significant structural repairs, or complete reinstatement within 15 years is not a bargain. It is a liability disguised as a saving.
Consider the costs involved in a premature pool failure. You are looking at excavation, disposal, new installation, landscaping reinstatement, and potentially weeks of disruption. When you add those costs to the original purchase price, the economics of choosing a lesser product look very different from the outset.
A pool built to last, backed by a credible lifetime warranty on the shell, removes that risk almost entirely. You pay once. You swim for generations.
What a Lifetime Warranty Actually Means
The phrase "lifetime warranty" gets used loosely in the pool industry, so it is worth being precise about what genuine coverage looks like. Leisure Pools, for example, offers a lifetime structural warranty on their composite fibreglass shells. This is not a marketing phrase. It reflects the manufacturer's confidence in the engineering behind the product.
Composite fibreglass construction is fundamentally different from older concrete or vinyl liner alternatives. The shell is non-porous, resistant to algae, and does not depend on a replaceable inner surface to remain watertight. There is no liner to degrade and no plaster to resurface. That structural integrity is what makes a long-term warranty credible rather than cosmetic.
For a homeowner, that warranty is also a form of financial protection. It is a contractual commitment from the manufacturer that shifts the risk of structural failure away from you.
Property Value and the Generational Argument
A well-specified, well-maintained pool adds measurable value to a residential property. Research from the US market consistently shows that a pool can add between 5% and 8% to a home's sale price, depending on location and specification. While UK figures vary by region, premium properties in desirable areas consistently command stronger premiums when a quality pool is present.
The key word there is quality. Estate agents will tell you that a tired, dated, or poorly maintained pool can actively deter buyers. A pool with visible structural issues, a worn liner, or outdated equipment is not a selling point. It is a negotiating chip for the buyer to push the price down.
A composite fibreglass pool in excellent structural condition, still covered by its original manufacturer warranty, tells a completely different story. It signals low maintenance liability, longevity, and care. For buyers, it represents immediate enjoyment with minimal remediation required.
Lifestyle Value Cannot Be Reduced to Numbers
The financial case is strong, but it is only part of the picture. A home pool changes how a family lives. It becomes the centre of summer entertaining, the place children learn to swim, the space where a homeowner genuinely switches off. These things have real but unquantifiable value.
The critical point is that this lifestyle value only compounds if the pool continues to perform well. A pool that develops problems, sits empty during repair periods, or requires constant attention becomes a source of stress rather than enjoyment. Durability is not just about money. It is about preserving the reason you bought the pool in the first place.
A pool you are proud of in year one should be a pool you are still proud of in year twenty-five. That is the standard a premium product should meet.
Comparing Pool Types Over the Long Term
It helps to look at the main options side by side when assessing long-term value:
- Vinyl liner pools: Lower initial cost, but liners typically need replacement every 8 to 12 years. Each replacement adds cost, disruption, and the risk of fitting complications. Structural longevity depends heavily on the underlying frame and installation quality.
- Concrete pools: Highly customisable and structurally durable, but the interior surface (plaster, pebble, or tile) requires resurfacing every 10 to 15 years. Ongoing chemical costs are also higher due to the porous surface. Construction timelines are lengthy, typically 3 to 6 months.
- Composite fibreglass pools: Higher upfront cost than vinyl, but the gel coat surface is non-porous and long-lasting, with no liner or plaster to replace. Installation is significantly faster, typically a matter of days once the excavation is complete. Lifetime structural warranties are realistic because the product is engineered to justify them.
Over a 30 to 40 year horizon, the total cost of ownership for a composite fibreglass pool is typically lower than the alternatives, even when the initial price is higher.
Choosing a Supplier Who Stands Behind the Product
A pool is only as good as the people who install it and the manufacturer who built it. When you are making a decision with a multi-decade time horizon, the stability and reputation of your supplier matters considerably.
Leisure Pools has a global track record spanning decades, with pools installed across multiple continents. That scale and longevity provides genuine reassurance that the warranty you are offered today will be honoured in ten or twenty years. It also means the product has been tested across an enormous range of conditions and climates, including the variable British weather that puts outdoor pools through their paces every year.
Choosing a premium product through an established UK distributor means you are not taking a leap of faith. You are making a considered, evidenced decision about where your money works hardest over the long run.
The Investment Framing That Changes the Decision
The homeowners who get the most from a pool investment are the ones who stop thinking about the purchase price in isolation. When you frame a pool as a 40-year asset, the maths of paying more for better construction, a stronger warranty, and a product built to outlast the alternatives becomes straightforward.
You are not spending more on a pool. You are spending less on replacements, repairs, and regret.
If you are at the stage of planning a pool for your home, the most useful thing you can do is ask hard questions about the structural warranty, the materials used in construction, and the manufacturer's track record. The answers will tell you everything you need to know about whether the pool in front of you is genuinely built for the long term.

Defining Excellence: What the Best Pool Builders and Installers Have in Common
Choosing who builds your swimming pool is arguably the most consequential decision in the whole project. The shell, the filtration, the finish, the warranty, all of it rests on the quality of the people behind it. Yet comparing builders is rarely straightforward. Everyone claims to be the best.
So what actually separates a top-tier pool builder from an average one? There are consistent patterns among the companies that deliver outstanding results year after year, and once you know what to look for, the differences become obvious.
A Track Record You Can Verify
The most reliable signal of quality is a body of completed work. Premium builders accumulate a substantial portfolio of finished pools, and they have no hesitation showing it to you in detail. That means real photographs of real projects, references from genuine homeowners, and ideally the opportunity to visit a completed installation in person.
Duration in the market matters too. A company that has been trading for fifteen or twenty years has navigated economic ups and downs, supply chain disruptions, and shifting customer expectations. That kind of resilience is earned, not bought. Be cautious of newer entrants who talk loudly but have little to show.
Technical Mastery, Not Just Sales Patter
The best builders have genuine technical depth. They understand how composite materials behave over decades, why shell geometry affects structural integrity, and how hydraulic design influences running costs. When you ask a pointed question, they answer it precisely rather than deflecting to a brochure.
This matters because a pool is not a simple product. It involves civil engineering, plumbing, electrical work, and water chemistry, all of which interact. A builder who can only discuss the headline features but stumbles on the specifics is a warning sign. Premium suppliers invest in training, accreditation, and staying current with manufacturing advances.
Innovation is another clear differentiator. The best builders work closely with leading manufacturers to bring newer technologies to their customers, whether that is advanced composite construction, energy-efficient variable-speed pumps, or automated water management systems. They treat product development as a competitive advantage, not an afterthought.
Transparency Throughout the Process
Top builders are clear about timelines, costs, and what is included. Their quotes are detailed and itemised, not vague round numbers designed to get you signed up before the real costs emerge. They will explain lead times honestly, including the realistic impact of weather, groundworks complexity, or equipment availability.
Transparency extends to what happens when things go wrong. No construction project is entirely without complications. A premium builder will tell you upfront how they handle unexpected groundwork findings, delays, or remedial work. An average one will go quiet and hope you do not notice until after you have paid.
A Customer Focus That Goes Beyond the Sale
There is a telling difference between builders who are highly attentive before you sign and builders who remain attentive after you sign. The best companies treat aftercare as seriously as the initial sale. That means a clear handover process, thorough guidance on water chemistry and routine maintenance, and a service team that picks up the phone.
This customer focus also shows up in how builders handle bespoke requirements. Premium homeowners rarely want an off-the-shelf solution. A top-tier supplier will work collaboratively to adapt dimensions, finishes, steps, and features to suit a specific garden or lifestyle, rather than pushing you toward whatever is easiest for them to install.
Warranties That Actually Mean Something
Warranty terms are one of the clearest ways to compare builders objectively. A company that offers a comprehensive, transferable lifetime structural warranty on the shell is making a substantial commitment. It signals confidence in the materials and in the quality of the installation. A short or heavily caveated warranty suggests the opposite.
Read the small print carefully. Some warranties cover only the shell itself and exclude the finish, fittings, or any consequential damage. Others are conditional on annual service contracts or the use of specific chemicals. The best warranties are straightforward, durable, and backed by a manufacturer with the financial stability to honour them decades from now.
Industry Engagement and Peer Recognition
Builders who take their profession seriously tend to be active in it. They contribute to industry bodies, engage with trade publications, and seek external validation of their standards. In the US market, recognition schemes like the Pool and Spa News Top 50 Builders programme evaluate companies on criteria including residential construction revenue, community involvement, and digital presence, and the companies that consistently appear on that kind of list share the same core qualities regardless of geography.
In the UK context, look for membership of relevant trade associations, manufacturer-accredited installer status, and any awards or recognition from independent bodies. These signals do not guarantee perfection, but they confirm a level of peer accountability that a completely unverified builder cannot offer.
How to Apply This When You Are Choosing
When you are evaluating potential builders, build a consistent shortlist of questions and apply them to everyone you speak to. Consider asking about the following:
- How many pools have they installed in the past three years, and can they provide references?
- What is covered under the structural warranty, and who underwrites it?
- Which manufacturers do they work with, and are they accredited by them?
- How do they handle complications during installation, and what is their remediation process?
- What does the aftercare service include, and for how long?
The answers will tell you a great deal, but so will the manner in which they are given. Confidence, specificity, and a willingness to be challenged are signs of a builder who has nothing to hide.
The Bottom Line
A swimming pool is a long-term investment in your home and your quality of life. The builder you choose will influence how that investment performs for thirty years or more. Taking time to understand the difference between premium and average is not excessive caution, it is due diligence. The hallmarks described here are consistent across the best builders in the industry, and they are the same criteria we apply when selecting partners and manufacturers to stand behind.

Seasonal Swimming Essentials: Gear and Safety Tips for Year-Round Pool Use
Outdoor enthusiasts have their packing lists down to a fine art. Hikers obsess over the right boots, layering systems, navigation tools, and emergency kit before they set foot on a trail. Pool owners deserve the same level of intentional preparation, especially when an enclosure turns your outdoor pool into a genuine four-season facility.
Year-round swimming is a different discipline to a few summer lengths. The water chemistry behaves differently in winter, the air inside an enclosure can catch you off guard, and the habits you build around safety matter more when you're swimming solo on a cold February morning. Think of this as your essential kit list for life under the arch.
Temperature Management: Layers Apply Here Too
Hikers layer up because conditions change fast. Enclosure swimmers face the same reality. Even with a polycarbonate roof keeping the worst of the British weather out, air temperature inside the structure can vary significantly between early morning and midday, and between January and July.
A good-quality thermal rash vest or neoprene swim top gives you options. Wear it for early sessions when the water hasn't yet warmed through, and leave it off once conditions settle. Neoprene gloves and swim socks are underrated for winter use, keeping the extremities comfortable without restricting movement.
After your swim, transition quickly. A changing robe (sometimes called a dryrobe) is genuinely useful, particularly if your enclosure is detached from the house. Getting from wet to warm without the wind hitting you is the difference between a refreshing experience and an unpleasant one.
Water Chemistry Kit: Your Year-Round Non-Negotiable
Enclosures reduce evaporation and limit UV exposure, both of which affect how your pool chemistry behaves compared to an open-air pool. Chlorine levels can read differently under cover, and algae can still take hold in a warm enclosed environment if you let things slip.
Keep a reliable test kit poolside rather than relying on occasional strip tests. The better digital testers measure free chlorine, pH, total alkalinity, and cyanuric acid in one go. Test at least twice a week in summer and weekly through winter. Consistent chemistry protects swimmers and protects the enclosure structure itself, since aggressive water can corrode fittings over time.
Stock a small supply of the essentials so you're never scrambling when levels drop:
- pH reducer and increaser
- Chlorine tablets or liquid chlorine
- Alkalinity booster
- Algaecide for preventative treatment
- Clarifier for post-heavy-use sessions
Safety Gear That Should Live Beside the Pool
Solo swimming in an enclosed pool is common, especially for early-morning fitness swimmers who want to get a session in before the household wakes up. That convenience comes with a responsibility to set up basic safety infrastructure that you'd expect at any serious aquatic facility.
A reaching pole and a throw rope or throw bag should be fixed to the pool surround, reachable within a couple of seconds from anywhere around the water. These are the two most effective pieces of rescue equipment for a domestic setting and they cost very little.
A first aid kit stored nearby is equally important. Slips on wet pool surrounds account for a significant proportion of domestic swimming injuries. Your kit should include:
- Sterile wound dressings and bandages
- Antiseptic wipes and cream
- Cold pack for impact injuries
- Disposable gloves
- An emergency contact card with key numbers
If you swim alone regularly, consider a waterproof personal alarm that you wear in the water. Some swimmers use a waterproof phone holder mounted poolside. Either approach gives you a means of raising help if something goes wrong.
Footwear and Poolside Surfaces
This sounds minor until someone goes down hard on a wet surround. Pool deck shoes or slip-resistant sandals should be standard issue for anyone using the enclosure. The area immediately outside the pool edge gets wet every single session, and the risk is highest in colder months when tiles or composite decking can become slick.
Anti-slip mats near the entry points and at the pool steps add another layer of protection. Make sure they're rated for wet outdoor use rather than bathroom mats, which tend to curl at the edges and become a hazard in themselves.
Lighting for Early and Late Sessions
One of the biggest advantages of a pool enclosure is the ability to swim outside typical daylight hours. Winter sessions before sunrise or after sunset are perfectly comfortable inside a well-designed structure. The catch is that the enclosure can feel significantly darker than an open pool on an overcast afternoon.
Underwater LED lighting is worth the investment for any swimmer who plans to use the pool seriously through autumn and winter. Good lighting improves visibility of the pool floor and walls, makes it easier to judge distance during lengths, and creates an atmosphere that actually makes you want to get in.
Supplementary lighting around the pool surround reduces the risk of trips during entry and exit. Motion-activated lights work well here since you don't need them on constantly.
Ventilation and Condensation Awareness
A common question from new enclosure owners is why the structure feels humid and why condensation appears on the panels. This is entirely normal: warm, evaporating pool water meets cooler surfaces, particularly in autumn and winter, and moisture builds up.
Modern enclosure systems include ventilation panels that you can open to manage this. Get into the habit of opening them during and after use, even in cooler weather. Good airflow reduces condensation, improves air quality for swimmers, and limits the conditions that algae and mould need to take hold on the enclosure frame.
A simple digital hygrometer (available for under £15) mounted inside the enclosure tells you the humidity level at a glance. Above 70 percent relative humidity for extended periods is a sign you need more ventilation.
Building a Routine That Works All Year
The best kit in the world only helps if you use it consistently. The swimmers who get the most from a pool enclosure are the ones who treat it like a proper training and leisure facility, not just a covered garden feature.
Set a brief weekly maintenance routine covering water testing, a wipe-down of the enclosure frame and glazing, and a check of all safety equipment. Monthly, inspect the enclosure tracks, seals, and ventilation panels for any wear. Staying ahead of small issues means they don't become expensive ones.
Year-round swimming is genuinely achievable in the UK climate. The enclosure does the heavy lifting on weather protection. The gear and habits you build around it make sure every session, from a grey November morning to a bright July evening, is safe, comfortable, and worth getting out of bed for.

Poolside Tech and Lighting: The Best Upgrades for Your Pool Enclosure
A pool enclosure already solves the hardest problem: keeping the weather out so you can swim in February without flinching. But once the structure is up, many owners stop there. The space itself, with its clean lines, controlled climate, and natural light, is quietly perfect for a second layer of investment. The right tech turns a swimming facility into an entertainment room you happen to swim in.
Why Pool Enclosures Are Ideal for AV Installations
Standard living rooms are compromised by natural light. Pool enclosures, by contrast, give you a degree of control that most rooms cannot match. Polycarbonate or glazed panels can be tinted or shuttered, humidity is manageable with proper ventilation, and the acoustic character of the space rewards careful speaker placement.
The enclosed environment also means you are not fighting wind noise or ambient outdoor sound. A modest sound system inside an enclosure performs well above its price bracket compared to the same kit used in an open garden.
Choosing the Right Display
The current TV market is genuinely good value. Retailers including Currys, Richer Sounds, and AO are carrying strong stock of OLED, QLED, and Mini-LED panels, with prices on 55-inch and 65-inch screens notably lower than they were two years ago. LG and Samsung both produce screens that handle reflections well, which matters enormously in a glass-sided space.
For poolside use, a few practical points should guide your choice:
- Brightness matters more than contrast in high-ambient-light conditions. Look for panels rated above 700 nits for daytime viewing.
- QLED and Mini-LED panels from Samsung tend to outperform OLED in very bright rooms because OLED's strength is in dark environments.
- Screen size should be proportional to viewing distance. A 65-inch panel is a reasonable starting point for an enclosure covering a 6-metre pool.
- Mount the screen on a solid wall section rather than a glazed panel, and use a fully sealed, humidity-resistant enclosure if the screen will be within two metres of the water.
Dedicated outdoor and semi-outdoor display brands like SunBrite offer IP-rated screens built specifically for humid environments. They cost considerably more than a standard OLED, but for permanent poolside installation they are worth considering over a consumer TV in a weatherproof box.
Sound Systems That Work in a Humid Space
Standard home theatre speakers are not designed for prolonged exposure to high humidity. The drivers, surrounds, and cabinet materials can degrade faster than you expect. The practical options are:
- Marine-grade or outdoor-rated speakers, brands like Sonance, Polk Audio's Atrium range, or Klipsch outdoor series, wired back to an amplifier in a dry adjacent room.
- Sonos architectural speakers, which use sealed cabinets and can be integrated into a whole-home system with straightforward app control.
- A waterproof Bluetooth speaker as a simpler, lower-cost starting point for enclosures where a full installation is not yet planned.
If you are running cabling during the enclosure installation or a renovation, plan speaker positions at that stage. Retrofitting cable runs through a finished enclosure is fiddly and adds unnecessary cost.
Lighting That Changes How the Space Feels
Lighting design in a pool enclosure does two jobs: it extends usable hours into the evening and it sets the atmosphere for entertaining. Both are worth thinking about separately.
For functional evening swimming, LED strip lighting along pool edges and underwater LED fittings are standard practice. Underwater LEDs are low voltage, energy efficient, and come in colour-changing variants that allow simple mood control from a phone app or wall panel.
For the enclosure structure itself, architectural LED profiles mounted to the aluminium framing work extremely well. The aluminium sections in a quality enclosure provide a natural channel for discreet strip lighting. Warm white (around 2700K to 3000K) creates an inviting atmosphere; colour temperature tunable fittings let you shift warmer for evening relaxation and cooler for daytime swimming sessions.
Brands like Philips Hue and LIFX both offer IP65-rated outdoor fittings that integrate with smart home platforms. This means a single routine can dim the enclosure lighting, start a playlist through your sound system, and adjust the pool heat pump setpoint at the same time.
Smart Home Integration Worth Having
The most practical smart home features for a pool enclosure cluster around three areas:
- Heating control: Smart thermostats and pool heat pump controllers (brands like Heatstar and Calorex offer compatible units) allow you to pre-heat the pool remotely so the water is ready when you arrive home.
- Ventilation and humidity: Motorised vent actuators can be tied to a humidity sensor so the enclosure vents automatically when conditions inside become too moist. This protects both the structure and any tech installed inside it.
- Lighting scenes: A single button press or voice command that sets lighting, music, and temperature simultaneously removes friction from using the space, which sounds trivial but genuinely affects how often the pool gets used.
Apple HomeKit, Google Home, and Amazon Alexa all support the kinds of devices described above. The choice largely comes down to what ecosystem you already use elsewhere in the house.
A Note on Installation and Safety
All electrical work near a pool falls under BS 7671 wiring regulations, specifically the requirements for special locations (zones 0, 1, and 2 around water). This is not optional compliance. Any licensed electrician can advise on zone requirements, but the key practical point is that any mains-voltage installation within 2 metres of the pool edge must use appropriate IP-rated equipment and may require RCD protection.
If you are planning a significant tech fit-out, involve a qualified electrician from the planning stage rather than retrofitting around existing cabling. The cost difference is small; the safety and reliability difference is significant.
Getting the Most From Your Enclosure Investment
An aluminium pool enclosure represents a meaningful investment in your property and your lifestyle. Adding well-chosen technology does not need to be complicated or expensive to make a real difference. A good screen, a simple outdoor sound system, controllable lighting, and basic smart heating controls can be assembled for a few thousand pounds, and the cumulative effect on how much the space gets used is considerable.
The pool season in the UK, even with an enclosure, benefits from every bit of comfort and convenience you can build in. Good tech is part of that, and right now the market for screens and smart home devices gives you more choice at better prices than at almost any point in recent memory.

Sustainable Pool Enclosures: Combining Solar Integration with Thermal Design for Year-Round Swimming
A pool enclosure already transforms an outdoor swimming pool into a year-round asset. Add a thoughtful solar strategy alongside it, and you shift from simply enjoying the water in November to doing so with a fraction of the energy footprint. For eco-conscious homeowners, this combination is one of the most practical ways to justify the investment in both.
This guide walks through how to position solar panels effectively around a pool enclosure, how the structure itself contributes to thermal efficiency, and what the realistic outcomes look like when you combine the two approaches properly.
Why Pool Enclosures Are Already an Energy Tool
Before reaching for a solar calculator, it helps to understand what a quality aluminium pool enclosure is already doing for your energy budget. A well-designed enclosure traps heat from sunlight and prevents wind chill from stripping warmth from the water surface. On a clear autumn afternoon, a glazed enclosure can raise the ambient temperature inside by several degrees compared to the open air outside.
That passive solar gain reduces the workload on your pool heater significantly. Studies on conservatory and greenhouse structures consistently show that even modest glazed enclosures can cut heating demand by 30 to 50 percent compared to uncovered pools. The enclosure does not eliminate your heating costs, but it gives any renewable energy system a much easier target to hit.
South-Facing Is Still the Golden Rule
Whether you are mounting panels on a roof, a garage wall, or a garden structure, the principle is the same: panels facing true south capture the most sunlight over the course of a day in the UK. Even a moderate deviation east or west reduces output, and north-facing panels lose a very significant proportion of their generating potential.
When planning solar alongside a pool enclosure, the first question is always which surfaces on your property face south or close to it. Your options typically include:
- The main house roof, particularly rear-facing slopes on homes with gardens to the south
- Garage roofs, which are often unobstructed and well-positioned
- Garden walls or boundary structures that catch afternoon sun
- Purpose-built pergola or terrace structures adjacent to the enclosure itself
Pitch matters too. In the UK, a roof slope between 30 and 40 degrees tends to produce the best annual yield. Flatter surfaces still work, but you lose some winter generation when the sun sits low.
Positioning Panels Around the Enclosure Itself
One question homeowners regularly ask is whether solar panels can be mounted directly on the pool enclosure. The honest answer is: it depends on the structure. A robust, professionally engineered aluminium enclosure can potentially support lightweight panel systems, but any integration must be planned at the design stage, not retrofitted without structural assessment.
The more practical approach for most installations is to treat the enclosure and the solar array as complementary elements of the same outdoor space, rather than a single combined unit. Position panels on adjacent structures so that they do not shade the enclosure glazing. Shading the enclosure reduces the passive solar gain that makes it so thermally effective, which would be counterproductive.
A layout that works well in many gardens places the enclosure centrally with clear sky above it, while a south-facing garage wall or lean-to structure nearby carries the solar panels. The two systems then work in parallel: one heats the water passively through glazing, the other generates electricity to power the pump, filtration, and any supplementary heating.
Plug-In Solar Panels as a Low-Commitment Starting Point
Not everyone is ready to commit to a full rooftop installation with battery storage and a new tariff arrangement. Plug-in solar panels have grown considerably in popularity as an accessible entry point. These smaller, portable units plug into a standard socket and offset your household electricity draw without requiring a full installation or grid export agreement.
For pool owners, a cluster of plug-in panels positioned on a south-facing patio wall or garden fence can make a meaningful dent in the electricity cost of running a pool pump, which typically draws between 500W and 1.5kW depending on the model and run time. You will not power a full heating system this way, but you can offset a real portion of the filtration and circulation costs.
As your confidence grows, a full rooftop system with a dedicated solar diverter can channel surplus generation directly into an electric pool heater or heat pump, making the most of summer overproduction that might otherwise be exported at a low rate.
Floating Solar Pool Covers: A Practical Middle Ground
One suggestion worth considering, particularly for homeowners who want to free up roof space for standard PV panels, is a floating solar pool cover. These sit on the water surface, generate a small amount of electricity, and simultaneously reduce evaporation and heat loss.
Inside an enclosure, evaporation is already reduced by the sheltered environment, but a floating cover adds another layer of thermal retention overnight when ambient temperatures drop. Using a cover inside an enclosure also means your main roof space remains available for a larger PV system dedicated to household loads, which tends to produce a better financial return than smaller, more fragmented installations.
Getting the Numbers Right Before You Commit
The financial case for combining a pool enclosure with solar depends on your specific situation, and vague promises about savings do not help anyone make a good decision. Before investing, gather a few key figures:
- Your current annual pool heating and running costs (your energy supplier can help with this if you have a separate pool meter)
- The south-facing roof or wall area available on your property
- Shading factors from trees, neighbouring buildings, and the enclosure structure itself
- Local planning constraints, particularly if you live in a conservation area or listed building
A qualified MCS-accredited solar installer can provide a site-specific assessment and generation estimate. Pair that with the thermal calculations for your chosen enclosure design, and you will have a realistic picture of the combined return rather than a best-case projection.
A Leisure Investment That Works Harder
Pool enclosures have always been about getting more from your outdoor space. Adding a renewable energy layer to that thinking is a natural extension, not a complication. When the glazed structure is doing its job, retaining heat and extending the usable season, the solar system has a smaller gap to bridge. The two technologies are genuinely complementary.
Done thoughtfully, this combination produces a pool that costs significantly less to run, generates fewer carbon emissions, and remains comfortable to use in conditions that would make an open pool completely impractical. That is not a niche aspiration. For a growing number of UK homeowners, it is becoming the sensible baseline.

Multi-Use Pool Design: How Enclosures Enable Year-Round Community and Family Swimming
The days of designing a pool for a single type of user are largely over. Today's pool owners, whether running a leisure centre, a school facility, or a large private estate, face a more complex brief: the space needs to work for competitive lane swimmers in the morning, a family splash session at the weekend, and perhaps a low-impact hydrotherapy group in between. Achieving that without friction is partly a scheduling challenge, but it is also, fundamentally, a design one.
One of the most practical and often overlooked tools for meeting that brief is an aluminium pool enclosure. Not just for keeping rain off the water, but for transforming a seasonal outdoor pool into a genuinely multi-functional asset that earns its keep all year round.
Why Diverse User Groups Need More Than Scheduling
Getting different user groups to share a pool comfortably requires more than clever timetabling. The environment itself has to work for each group. Competitive swimmers need consistent water temperature and reliable lane conditions. Families with young children need warmth, shelter, and a sense of ease. Older adults or people in rehabilitation need calm water, accessible entry points, and protection from wind and cold that would otherwise shorten their sessions dramatically.
An outdoor pool without an enclosure can really only satisfy one of these groups well: those willing and able to swim regardless of the weather. Everyone else ends up squeezed into an indoor facility or, more often, simply not swimming at all between October and April. That is a significant proportion of the year to write off.
An aluminium enclosure changes the equation. It buffers against wind, retains solar heat, and keeps the water at a usable temperature across all four seasons. That single shift unlocks the pool for a much wider range of users, at a much wider range of times.
The Practical Value of Extending the Season
In the UK, an unenclosed outdoor pool is realistically usable for perhaps 16 to 20 weeks of the year, depending on location. Add an aluminium enclosure and that figure stretches to 52. The difference is not marginal; it is the difference between a seasonal amenity and a year-round facility.
For commercial pool operators, this has a direct impact on revenue and return on investment. A pool that sits dormant for six months is still costing money in maintenance, insurance, and capital servicing. One that stays open and in use pays back its infrastructure costs at a far healthier rate.
For private homeowners, the calculation is slightly different but equally compelling. A pool enclosure protects the pool shell and equipment from the worst of winter conditions, reduces chemical consumption by limiting debris and evaporation, and means the pool gets used by the whole family rather than just the most enthusiastic swimmers on the warmest days.
Designing the Enclosure Around the User Mix
Not all enclosures suit every pool or every user group. The design choices matter, and getting them right from the start avoids expensive retrofitting later.
- Height and headroom: Facilities serving competitive swimmers or water polo groups need enclosures with sufficient internal clearance for stroke development and diving starts. Domestic enclosures can be lower profile, but lane swimming still requires generous headroom.
- Ventilation: Humidity management is critical, particularly when the pool is in regular use. Retractable roof sections, louvred panels, and automated venting systems keep air quality comfortable without the need to fully open the structure to the elements.
- Access and entry points: For facilities serving older adults or those with mobility considerations, the enclosure design needs to accommodate step-free entry, wider door openings, and clear sightlines to poolside safety features.
- Glazing and light: Natural light has a measurable effect on how welcoming and usable a pool environment feels. Polycarbonate glazing panels in aluminium enclosures can admit significant natural light while still providing thermal and weather protection.
At Arch Enclosures, our patented aluminium systems are engineered to be configured around the specific demands of each site. That means working through the actual user mix at the design stage rather than applying a standard template and hoping it fits.
Balancing Openness and Protection
One concern that comes up regularly, particularly from domestic clients, is whether an enclosure will make the pool feel closed in or institutional. It is a fair question. An enclosure that turns a pleasant outdoor pool into something resembling a sports hall has not done its job well.
Good enclosure design resolves this through modularity and sliding sections. Retractable roof systems allow the enclosure to open fully on warm days, preserving the open-air experience that makes an outdoor pool worth having in the first place. On cooler or wetter days, the same structure closes back down and keeps everyone comfortable. The pool adapts to conditions rather than forcing users to adapt to the pool.
This flexibility is particularly valuable for facilities serving mixed user groups. A competitive swimmer training at 6am in November needs protection from the cold. A family having a barbecue beside the pool on a July afternoon wants the roof open and the space to feel expansive. An enclosure that handles both scenarios well is genuinely serving the diversity of its users.
Protecting the Investment Long Term
Beyond the user experience, an enclosure does substantial work in protecting the physical pool itself. UV degradation, freeze-thaw cycling, and wind-driven debris all cause cumulative damage to pool shells, tiling, and mechanical systems. An aluminium enclosure significantly reduces exposure to all three.
Aluminium as a material is particularly well suited to this role. It does not corrode in the same way as steel, requires minimal maintenance over its lifespan, and holds its structural integrity in the wet and chemically active environment of a pool surround. For a facility expected to serve a community or a family for decades, that durability matters considerably.
The operational savings compound over time too. Enclosed pools lose less heat through evaporation, which reduces heating costs. They accumulate less debris, which reduces filtration load and chemical use. For any pool owner doing a serious cost analysis, these are not trivial figures.
Starting the Conversation Early
The most effective enclosure projects are those where the structure is considered alongside the pool design itself rather than added on afterwards. Retro-fitting an enclosure to an existing pool is entirely possible, and Arch Enclosures handles a substantial number of retrofit projects each year. But building in the enclosure from the start allows for better integration of foundations, drainage, access routes, and equipment housing.
If you are planning a new pool, or reconsidering how an existing one serves your users, the conversation about enclosure design is worth having early. The questions are practical: who will use the pool, when, and in what conditions? What does year-round access mean for your operation or your family? What flexibility do you want between open-air and enclosed use?
Get those answers clear, and the right enclosure design follows from them. That is the point at which a pool stops being a seasonal asset and starts being something genuinely useful to everyone who uses it, throughout the year.

Composite Materials 101 for Pool Owners: What Makes a Premium Pool Shell Different
When a pool company talks about a 'composite shell', it can sound like marketing shorthand. But there is real engineering behind the term, and understanding it even at a basic level will help you ask better questions, compare products more confidently, and know exactly what you're getting for your money.
What a Composite Actually Is
A composite material is made by combining two or more distinct materials that, working together, perform better than either one could on its own. Think of reinforced concrete: steel and concrete are both useful separately, but together they handle both tension and compression in ways neither manages alone.
In pool construction, the composite in question is a fibre-reinforced polymer (FRP). The two key components are:
- Reinforcing fibres (usually fibreglass, and in premium shells, layers of woven or chopped strand material alongside structural fabrics)
- A resin matrix that binds those fibres together and transfers loads across the structure
Neither element alone gives you a pool shell. The fibres are strong in tension but need the resin to hold them in position and spread stress evenly. The resin gives shape and surface quality but would crack under load without the fibre reinforcement. Together, they create something rigid, watertight, and remarkably light for its strength.
The Role of the Fibres
Fibreglass is the workhorse of composite pool construction. Individual glass filaments are extremely strong in tension, and when arranged in layers they give the shell its structural backbone. The direction in which those fibres are laid matters a great deal: random chopped strand provides general stiffness, while woven or stitched fabrics allow engineers to place strength exactly where a shell needs it most, around the steps, the rim, the floor.
Premium manufacturers go further than a basic spray-up process. Rather than simply spraying chopped fibres onto a mould, they build up the shell in deliberate laminate schedules, alternating fabric types and resin applications to achieve consistent thickness and controlled mechanical properties throughout. This is where budget shells and premium shells start to diverge noticeably.
Why Resin Quality Is Not a Small Detail
The resin is the continuous phase in the composite, meaning it surrounds and bonds every fibre. Its quality determines how the shell handles water absorption, UV exposure, thermal cycling, and chemical contact over a lifetime of use.
Isophthalic polyester and vinyl ester resins are common in quality pool shells. Vinyl ester in particular offers excellent resistance to the osmotic blistering that has plagued older fibreglass pools, because it absorbs water far more slowly and maintains its bond with the fibres under prolonged immersion. A pool shell that uses a high-grade resin system and an appropriate gelcoat will stay structurally sound and visually consistent for decades, not just seasons.
How This Compares to Older Construction Methods
Before composite pools became the standard for quality residential installations in the UK, the main alternatives were concrete (gunite or shotcrete) and liner pools over a steel or polymer frame. Each has well-known drawbacks.
- Concrete pools are heavy, porous, and require acid washing, resurfacing, and significant ongoing chemical use to stay manageable. They can crack as ground conditions shift, and repairs are invasive.
- Liner pools are more affordable upfront but the liner itself needs replacing every eight to twelve years on average. The join between the liner and fittings is a recurring source of leaks, and the aesthetics are limited.
Composite shells sidestep both sets of problems. The gelcoat surface is non-porous, so algae has far less to cling to and chemical demand drops noticeably. The shell is manufactured off-site in a controlled environment, arrives as a single piece, and does not rely on a separate membrane to stay watertight.
The Strength-to-Weight Advantage
One of the most useful properties of fibre-reinforced composites is their high strength-to-weight ratio. A composite pool shell is substantially lighter than an equivalent concrete structure, which simplifies installation, reduces the load on surrounding ground, and makes craning the pool into position far more straightforward.
This is not just a logistical convenience. A lighter shell places less stress on the excavation walls during installation and gives more flexibility in gardens where access is restricted. For many UK properties with narrow side access or compact rear gardens, a composite shell can be installed where a concrete pool simply could not.
What Makes a Premium Composite Shell Stand Apart
Not all composite pools are built to the same standard. A few things separate a genuinely premium shell from a basic one:
- Laminate schedule: how many layers are applied, in what order, and whether the process is controlled manually or relies on spray-up alone
- Resin specification: whether a blister-resistant resin system is used throughout, not just at the surface
- Structural reinforcement: additional material around high-stress areas such as steps, ledges, and the pool rim
- Gelcoat quality: the outer surface finish affects both aesthetics and long-term resistance to UV fading and surface etching
- Manufacturing environment: temperature and humidity-controlled production ensures consistent cure and reduces the risk of voids or delamination
Leisure Pools, whose shells Swimpools supplies in the UK, uses a composite construction process that incorporates multiple reinforcement layers and a high-grade resin system, backed by a lifetime structural warranty. That warranty is only possible because the manufacturer has confidence in what the laminate will do over decades of real-world use.
What This Means for You as a Buyer
Understanding the basics of composite construction gives you a framework for evaluating what you're being sold. When comparing pool shells, it is worth asking suppliers directly about their laminate process, the resin system used, and what the structural warranty actually covers.
A premium composite pool is not just a hole in the ground with a nice finish. It is a precisely engineered structure designed to hold tens of thousands of litres of water, resist ground movement, handle constant chemical exposure, and look good doing it for the better part of your lifetime. The materials at its core are what make that promise credible.
Five image styles to choose from
Every article gets a custom hero image generated to match. Pick the look that fits your brand, and change it any time. Click any thumbnail to see it full size.

Polished business imagery with strict no-text-artifacts rules.

Professional photography, no overlaid text. Editorial feel.

Photo plus a bold title overlay. Great for social shares.

Modern flat illustration. Friendlier, less corporate.

Looks like a real customer photo on a phone. Authentic, unpolished feel.
Everything you need, nothing you don't
A complete content pipeline you can fully automate, or take the wheel on any individual article whenever you want.
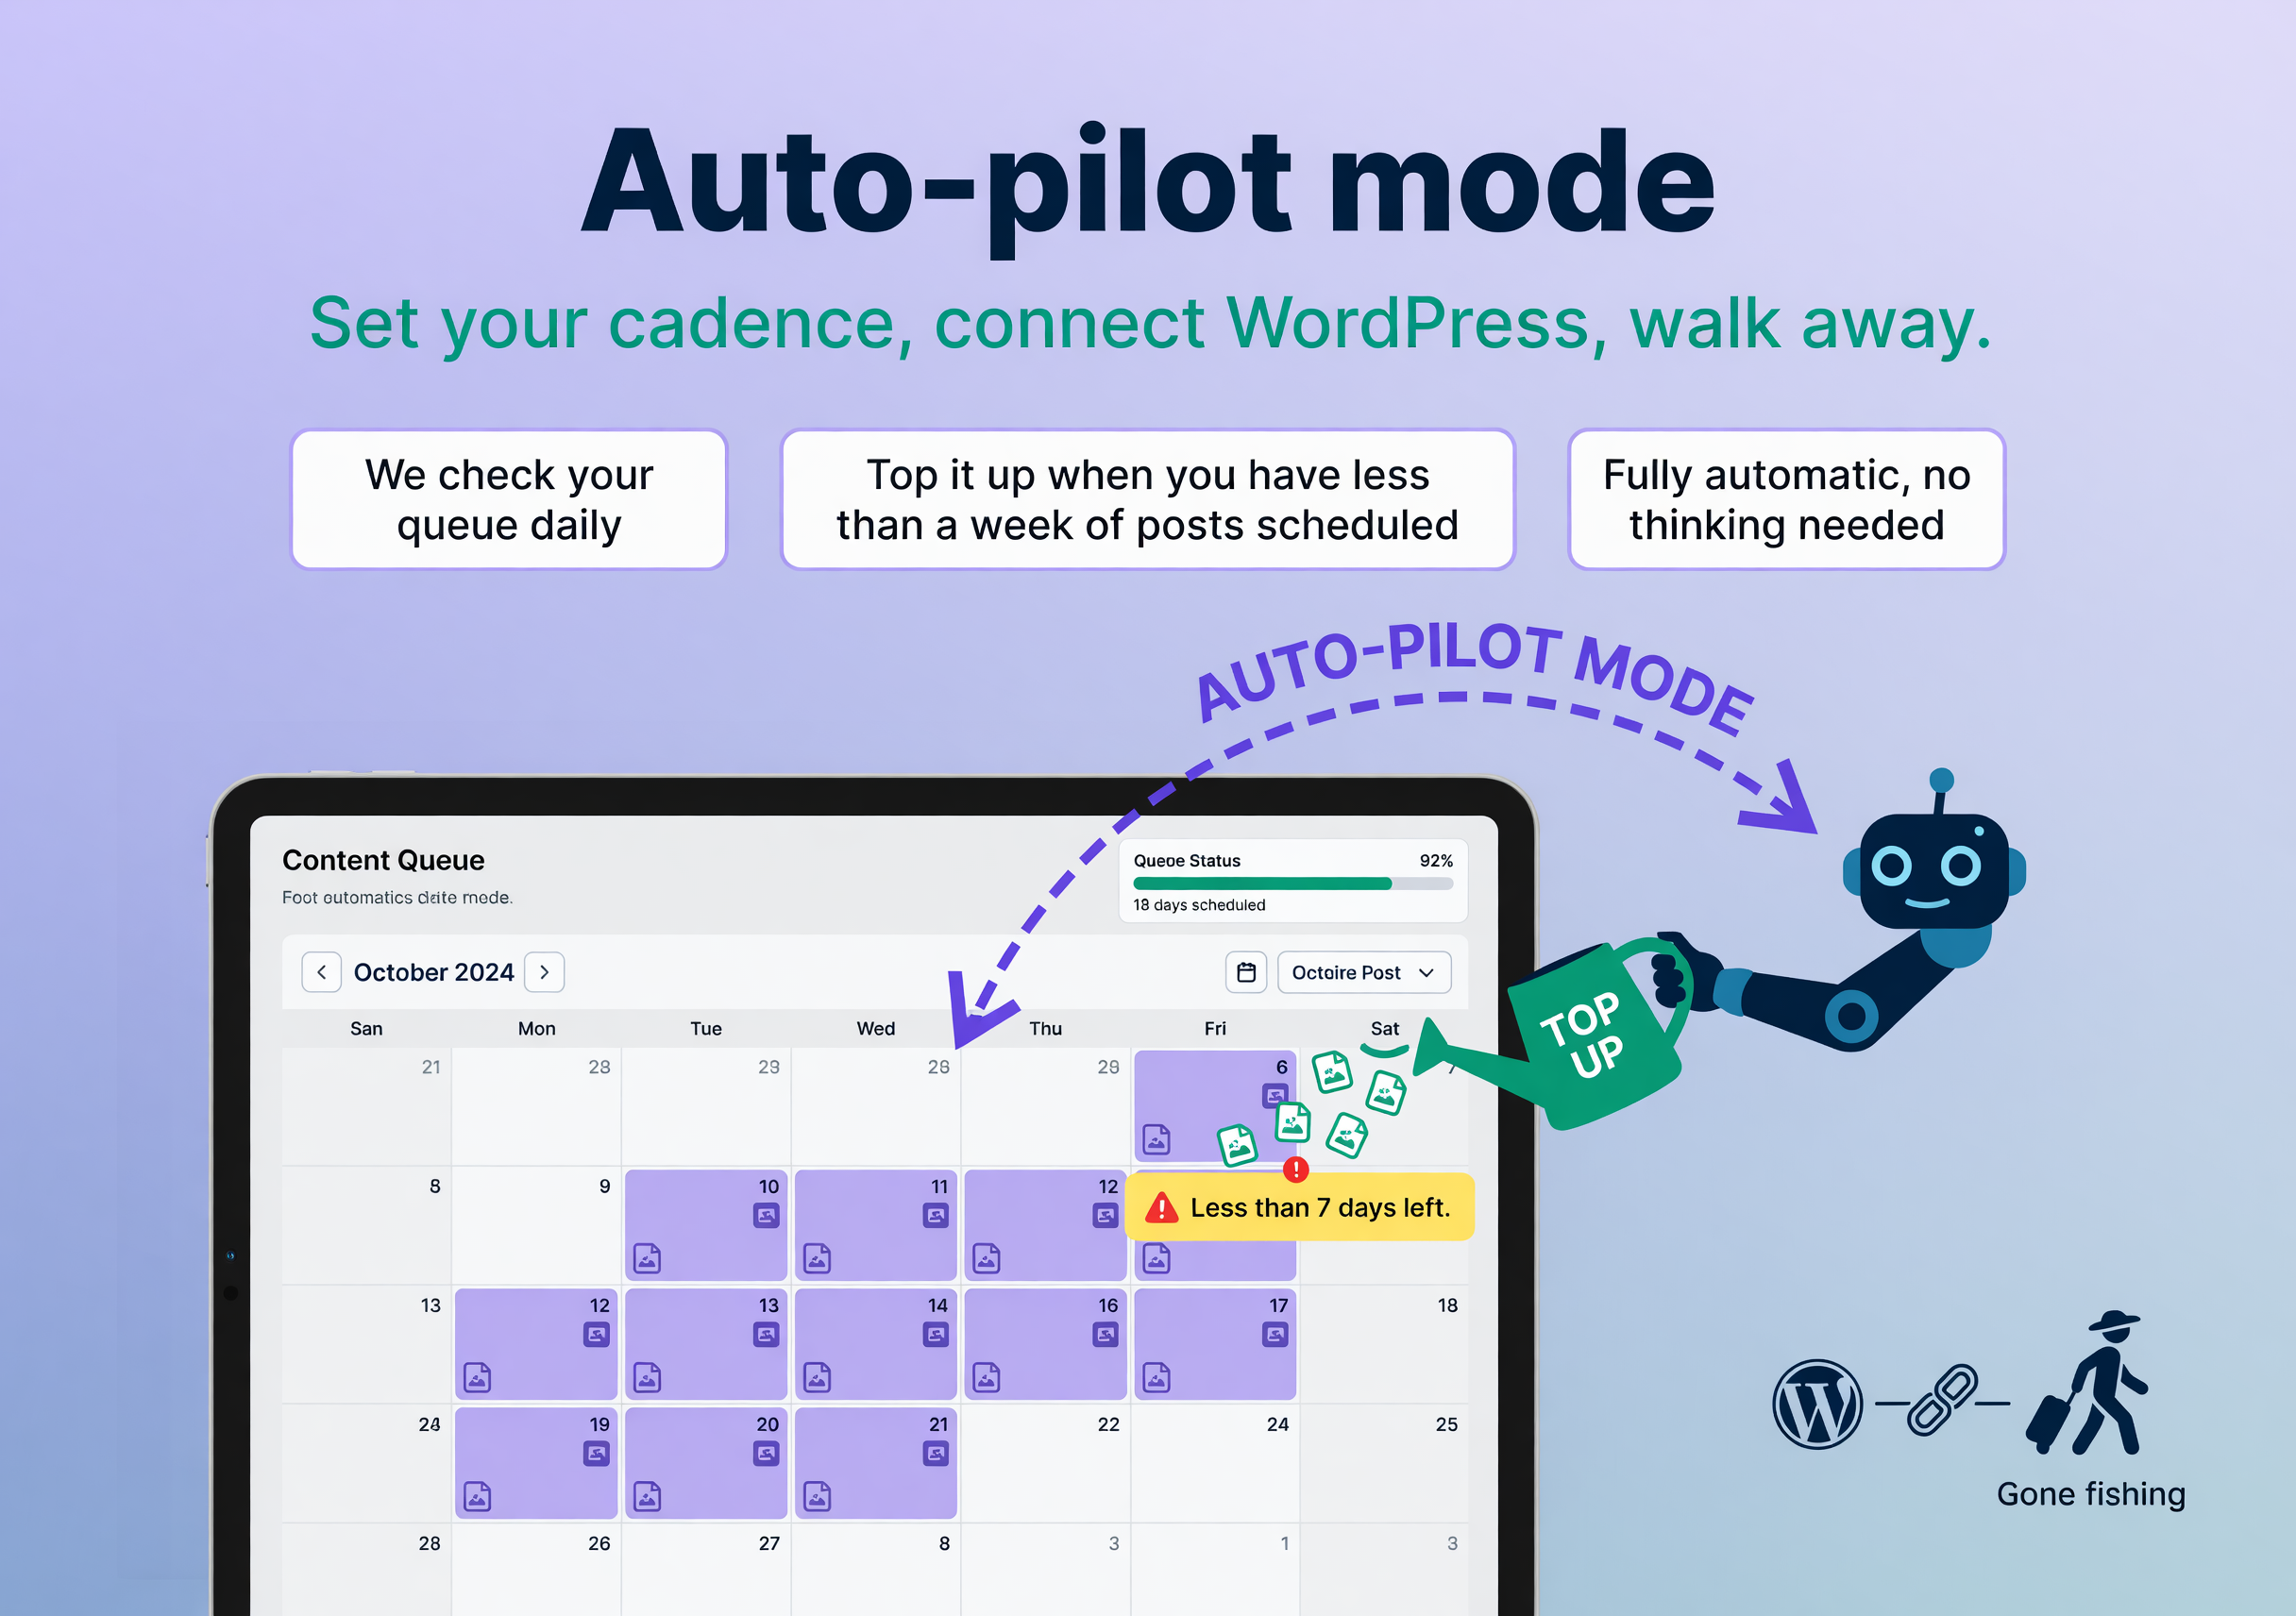
Auto-pilot mode
Set your cadence, connect WordPress, walk away. We check your queue daily and top it up when you have less than a week of posts scheduled. Fully automatic, no thinking needed.
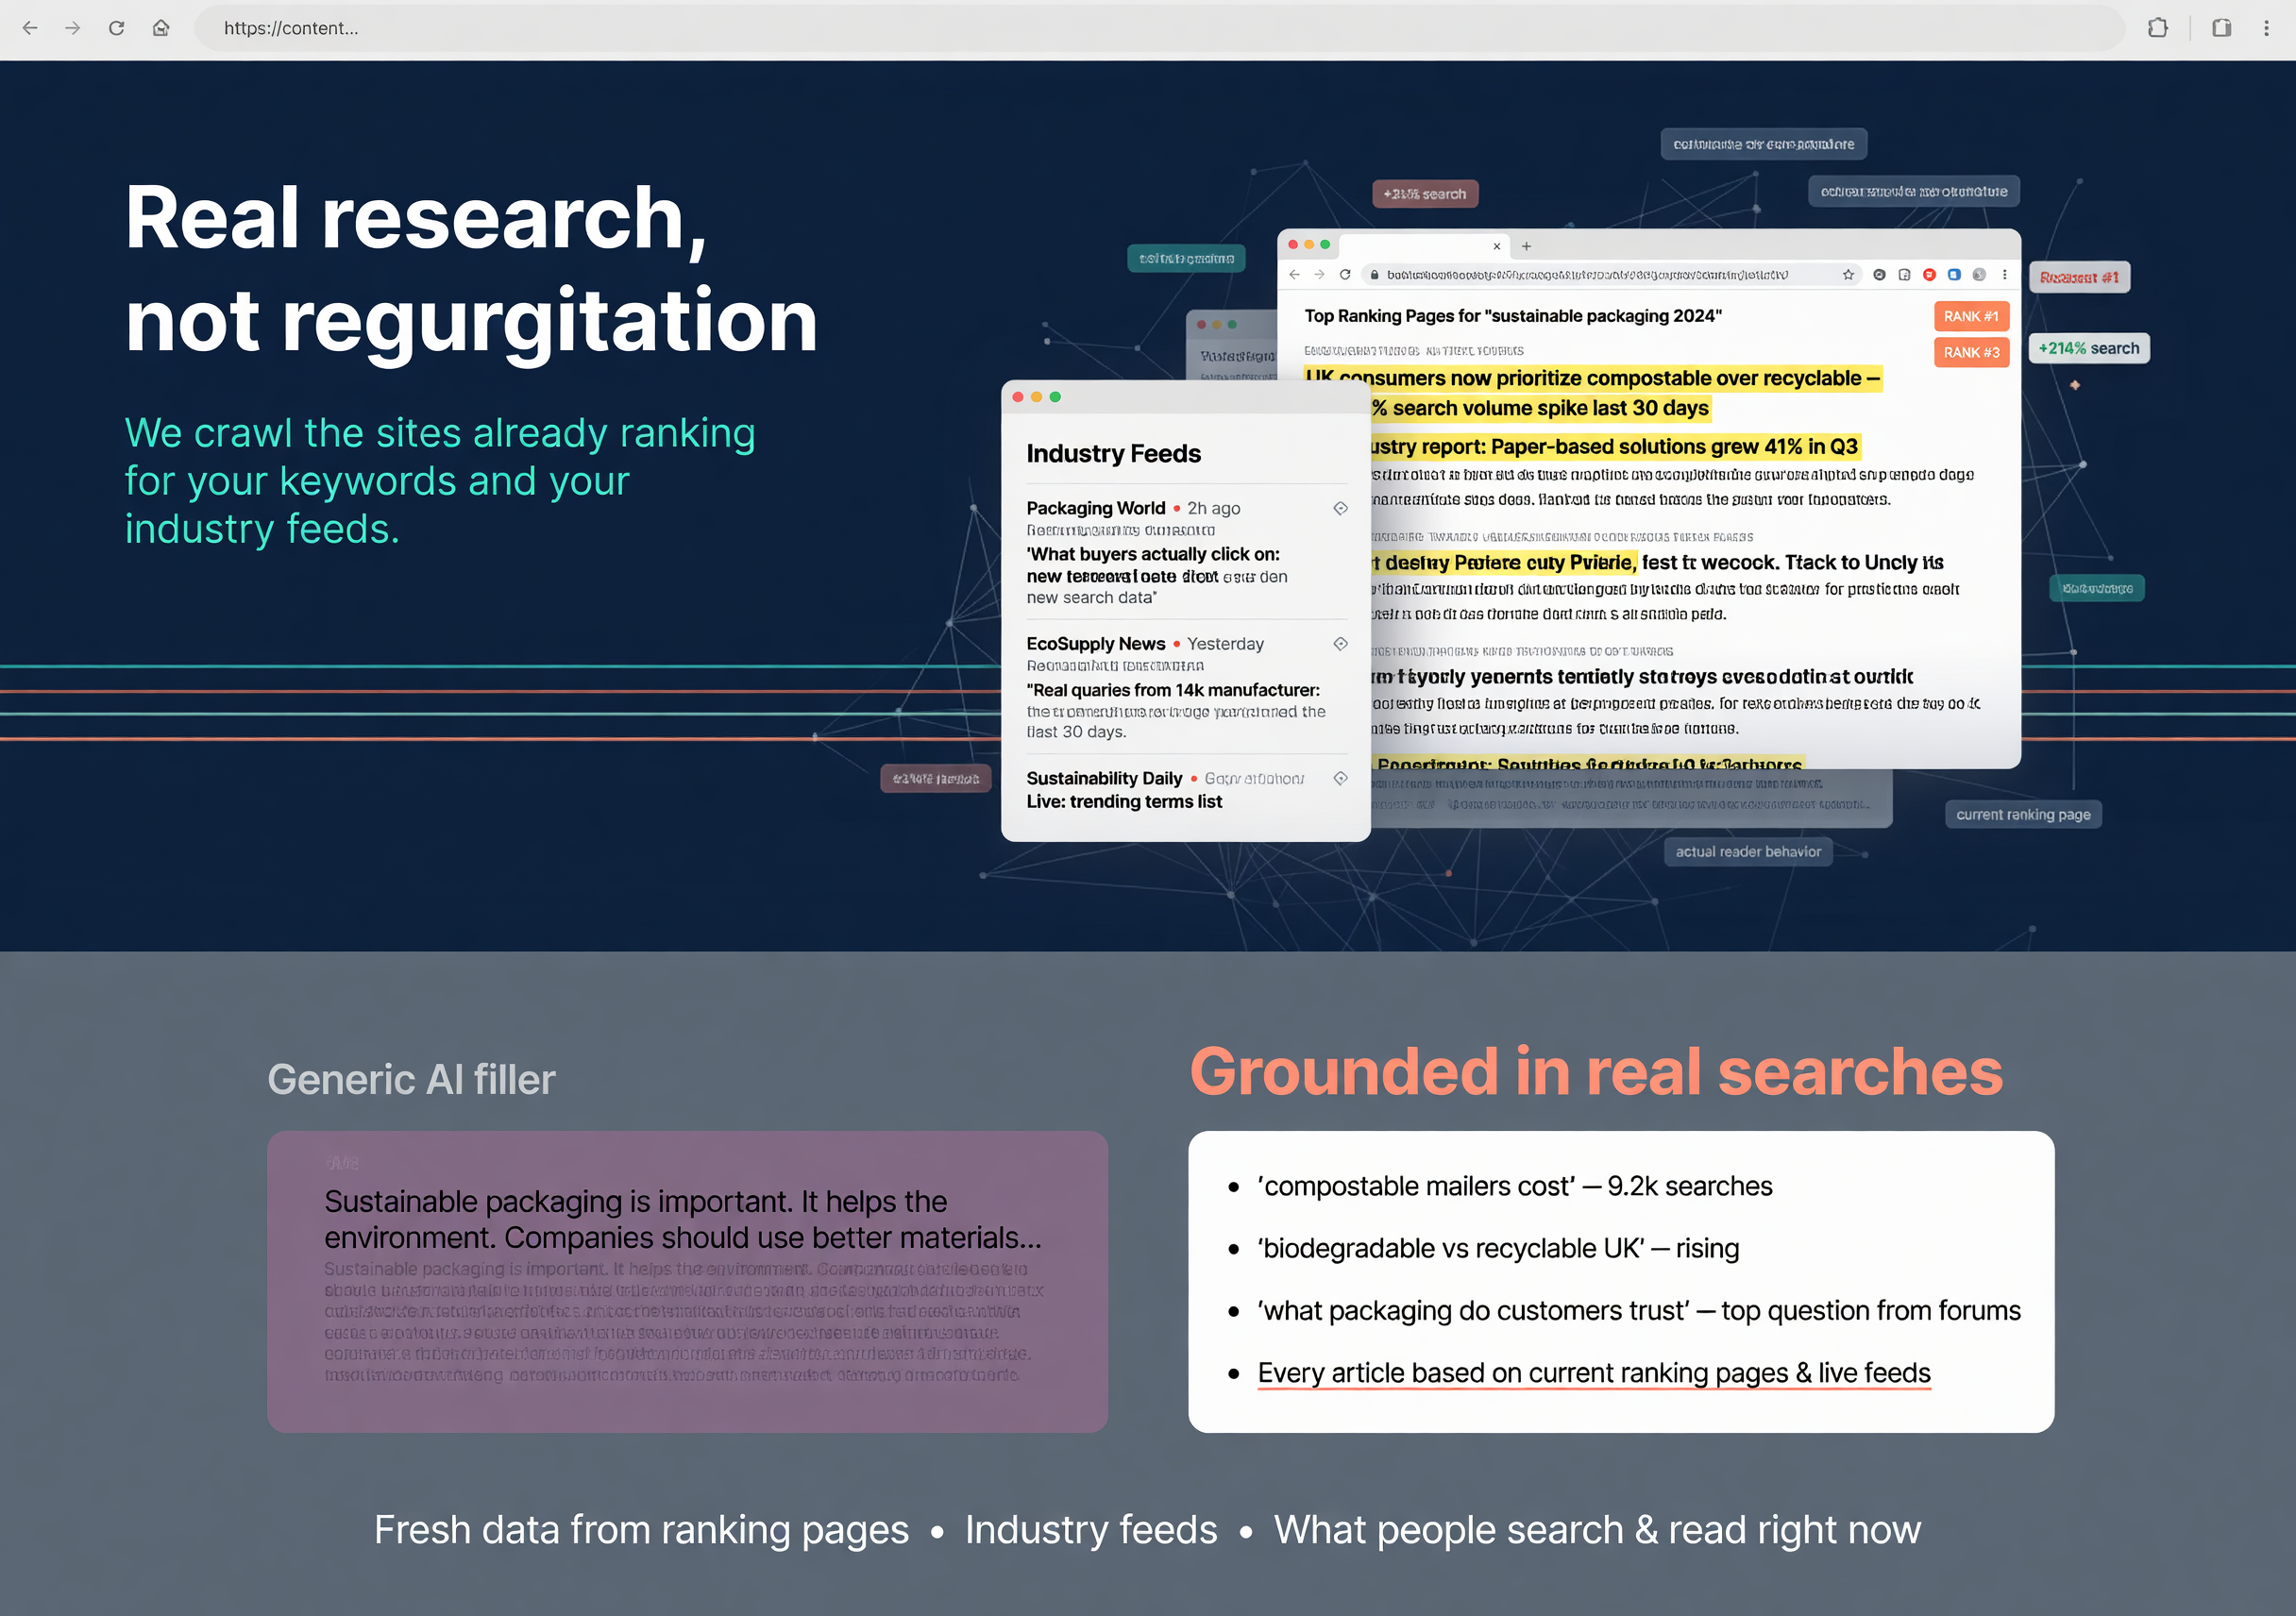
Real research, not regurgitation
We crawl the sites already ranking for your keywords and your industry feeds. Every article is grounded in what people actually search for and read right now, not generic AI filler.
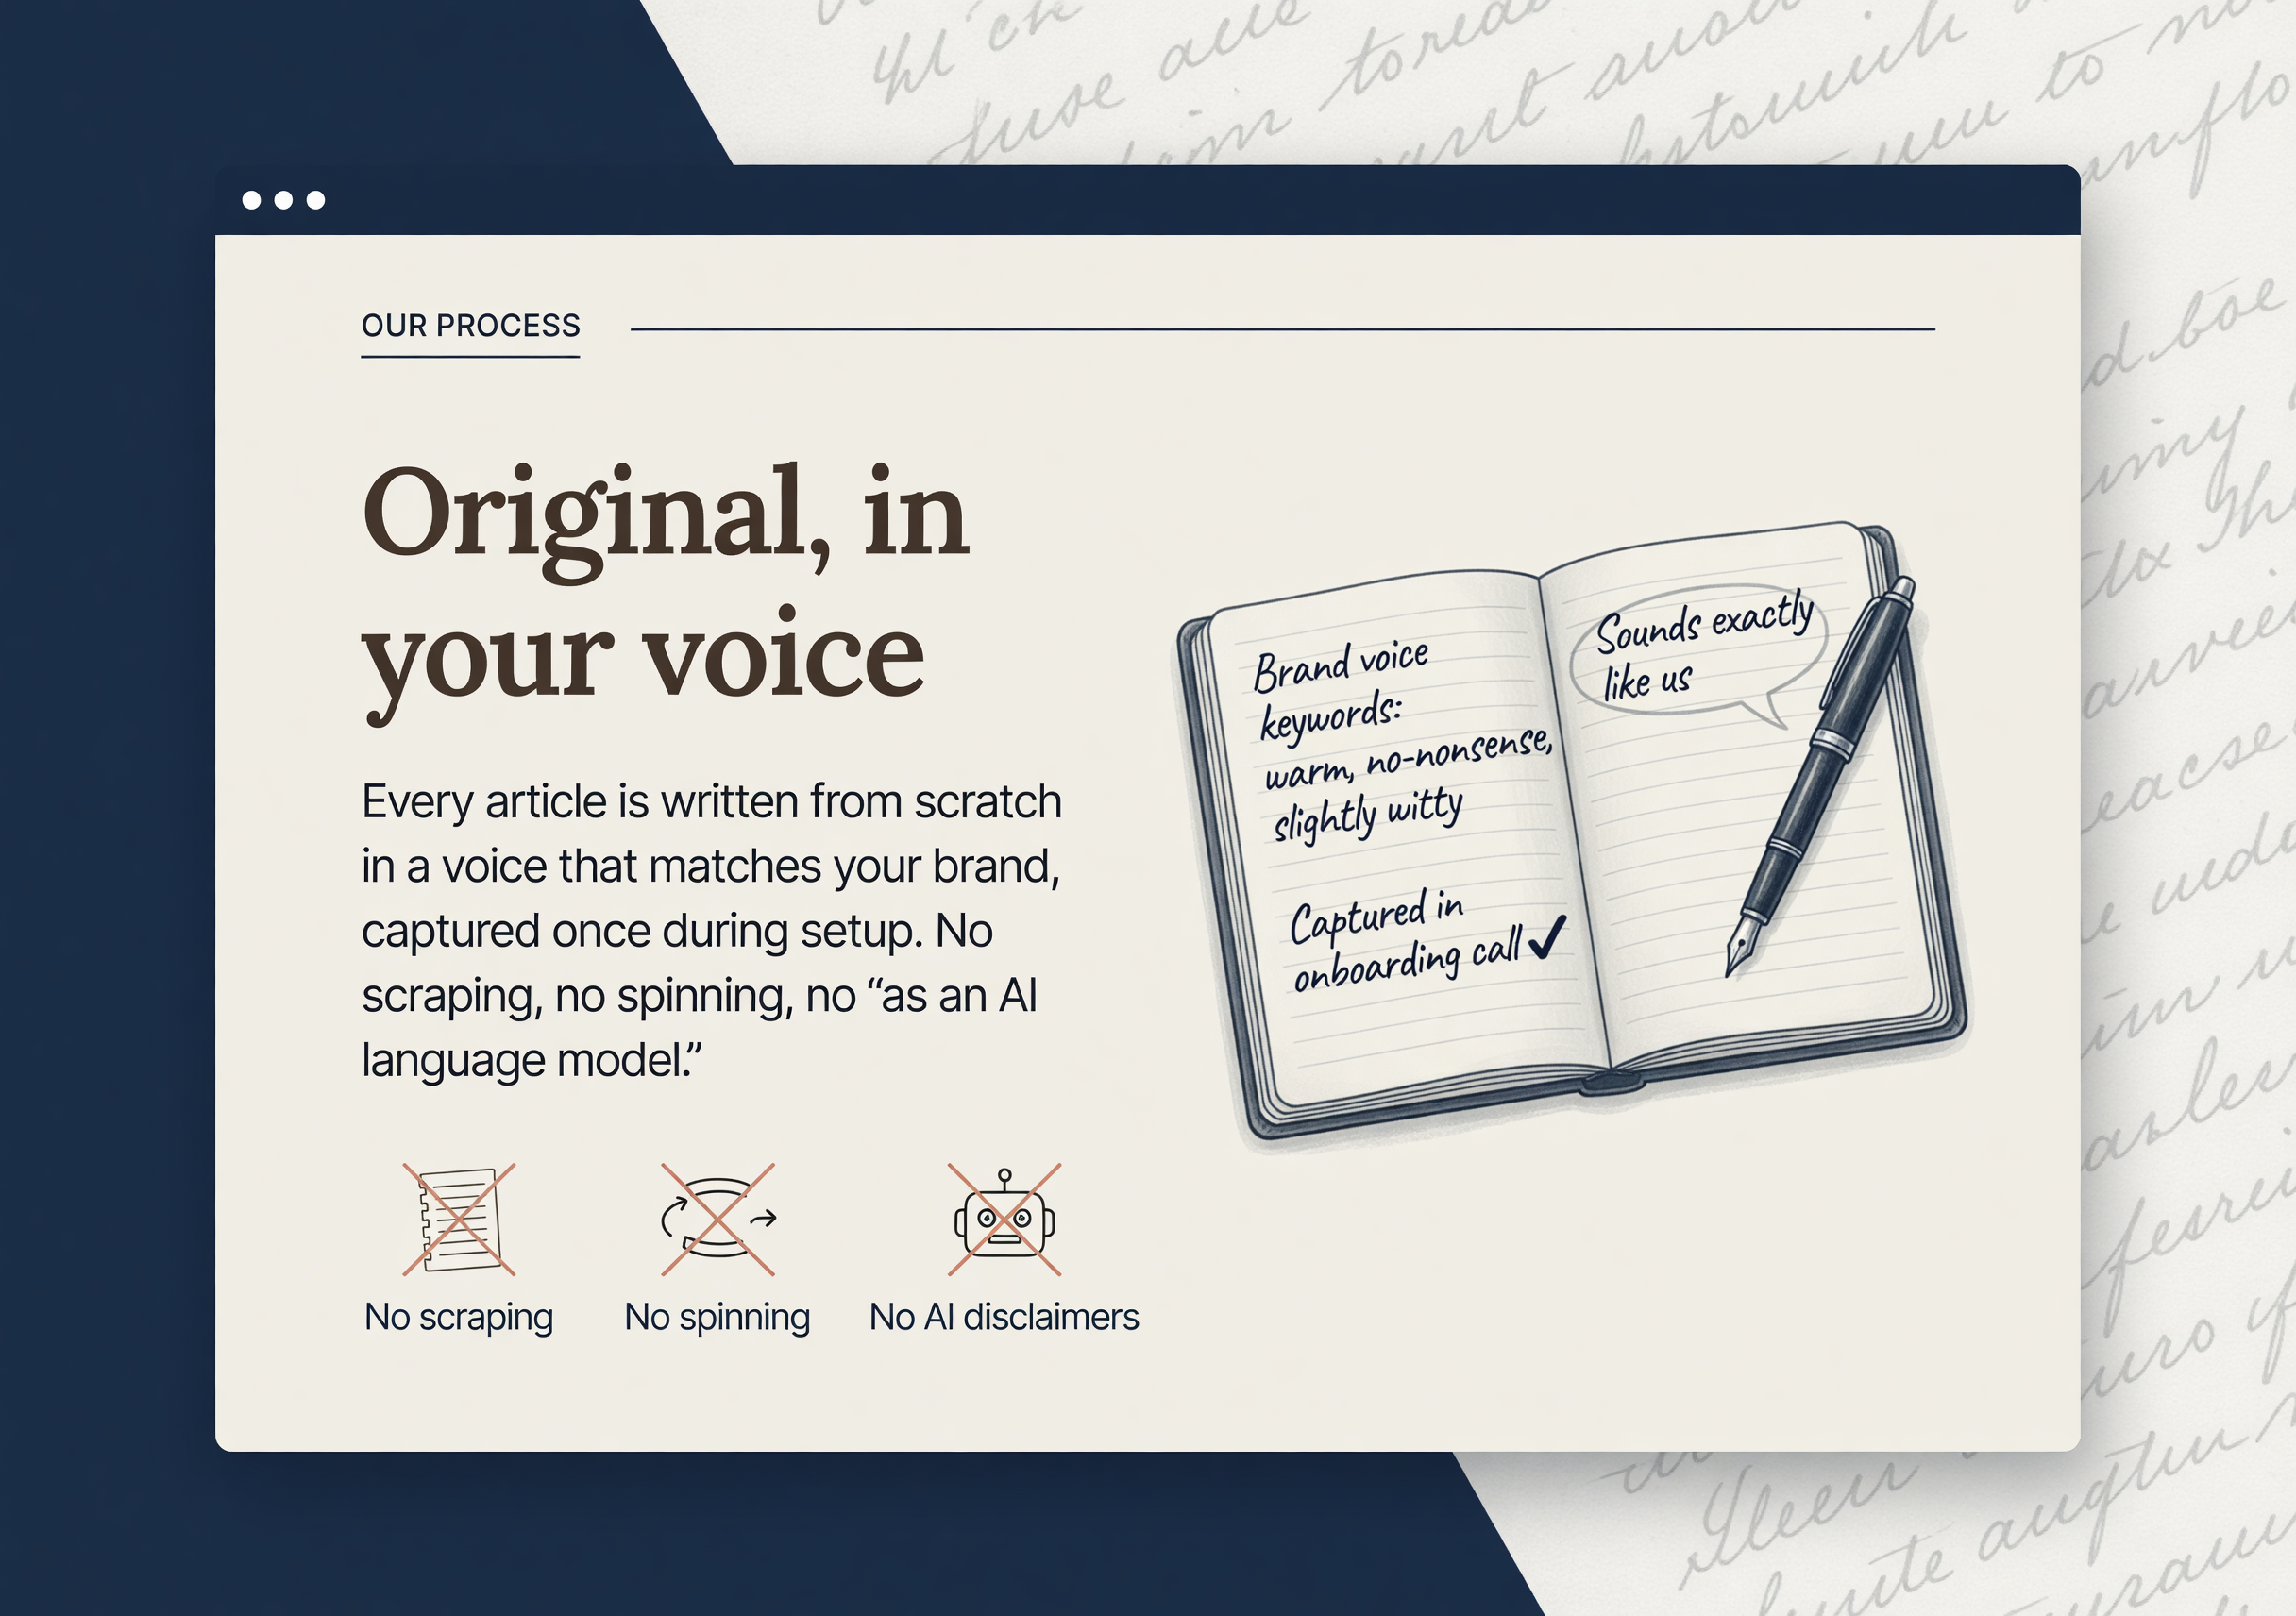
Original, in your voice
Every article is written from scratch in a voice that matches your brand, captured once during setup. No scraping, no spinning, no "as an AI language model".
Custom hero images
A unique on-brief image generated for every post in your chosen style. No more grabbing the same stock photos everyone else uses.
SEO baked in
Meta titles, descriptions, structured headings, internal linking suggestions, keyword targeting, all handled. Designed to rank, not just to fill space.
Direct WordPress publish
Posts go live automatically at the schedule you set, pushed straight to WP via the API. No copy-paste, no plugin install.
Rewrites + image regens
Don't love an article? Click Rewrite, we'll redo it on our credit, up to three times per article. Same for image regenerations.
Download every format
HTML, Markdown, Word, PDF. Articles are yours to keep, repost, repurpose, even if you cancel.
Done-for-you WP setup
Don't want to mess with API passwords? Drop in your WordPress login and we'll connect your site for you, free of charge. Same for the blog page itself if you don't have one yet.
Topic filtering
Block words or phrases you never want in articles. We filter at harvest time so the classifier never wastes credits on them.
Credits never expire
Buy credits when you want them, spend them when you want to. No "use it or lose it" pressure, no monthly resets that punish slow weeks.
No lock-in
Cancel any time from the Stripe billing portal. No setup fee, no minimum term, no awkward email exchange to leave.
Set your cadence, connect WordPress, walk away. We check your queue daily and top it up when you have less than a week of posts scheduled. Fully automatic, no thinking needed.
We crawl the sites already ranking for your keywords and your industry feeds. Every article is grounded in what people actually search for and read right now, not generic AI filler.
Every article is written from scratch in a voice that matches your brand, captured once during setup. No scraping, no spinning, no "as an AI language model".

A unique on-brief image generated for every post in your chosen style. No more grabbing the same stock photos everyone else uses.

Meta titles, descriptions, structured headings, internal linking suggestions, keyword targeting, all handled. Designed to rank, not just to fill space.
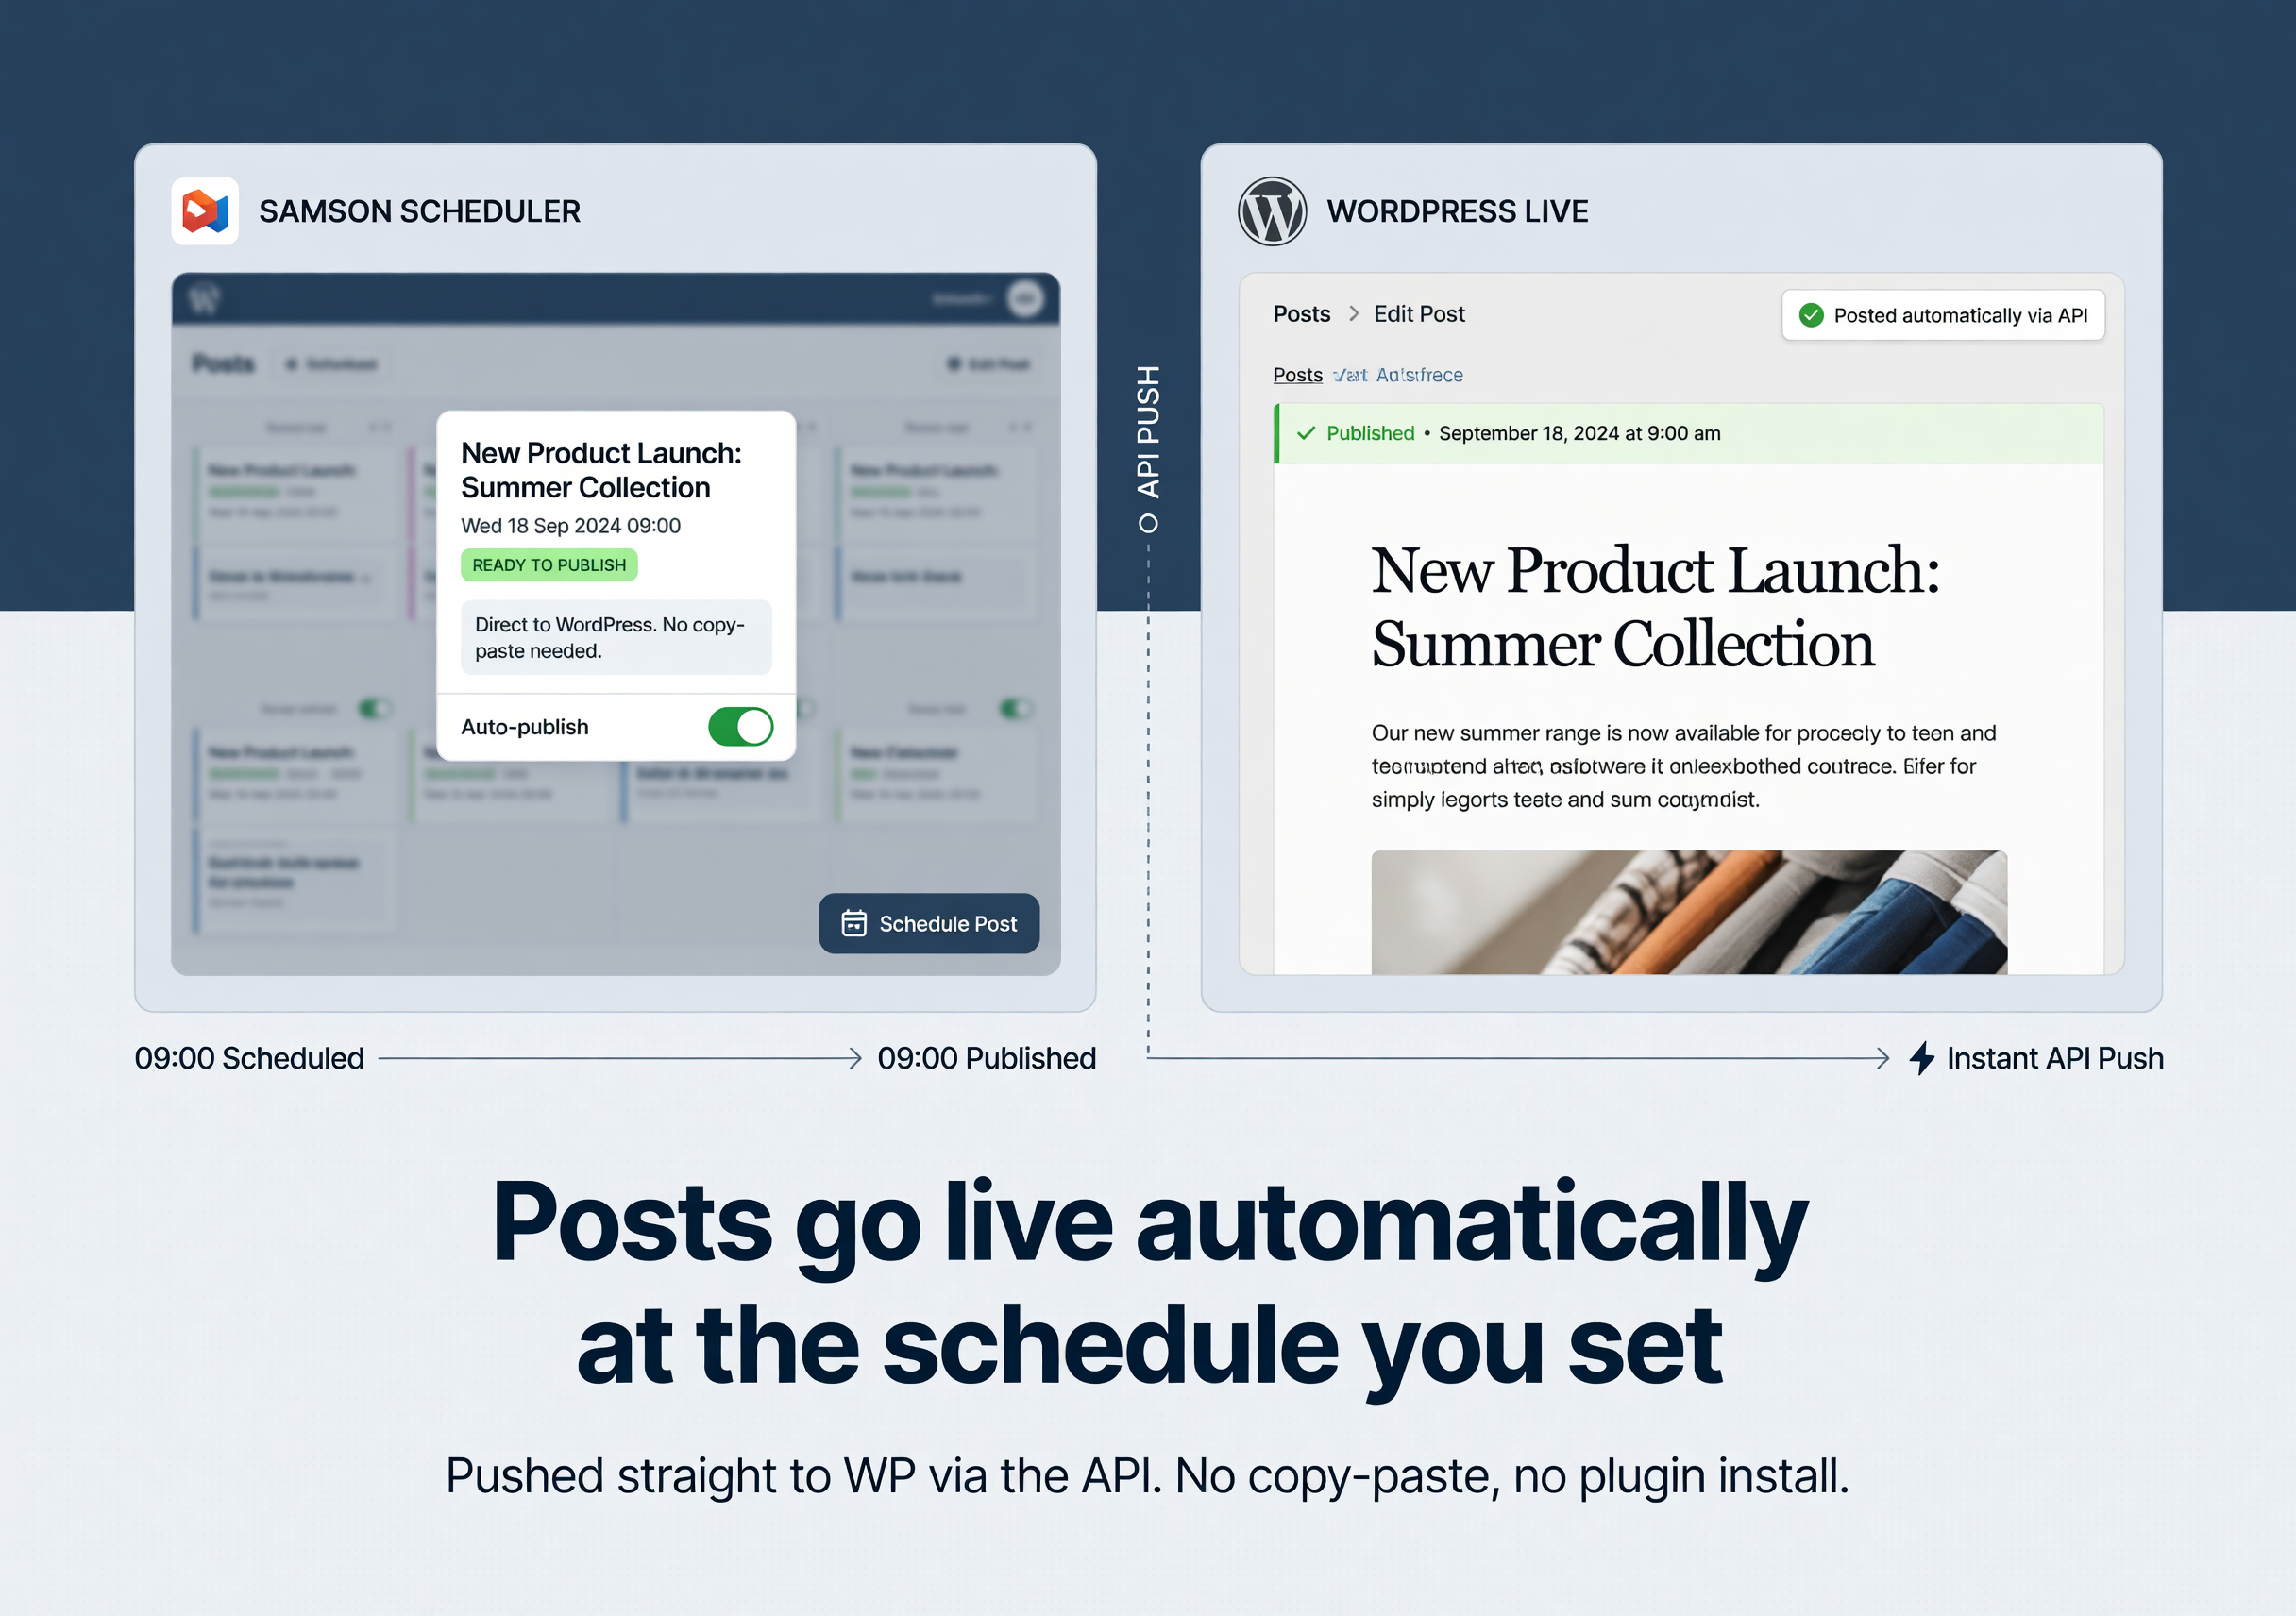
Posts go live automatically at the schedule you set, pushed straight to WP via the API. No copy-paste, no plugin install.

Don't love an article? Click Rewrite, we'll redo it on our credit, up to three times per article. Same for image regenerations.
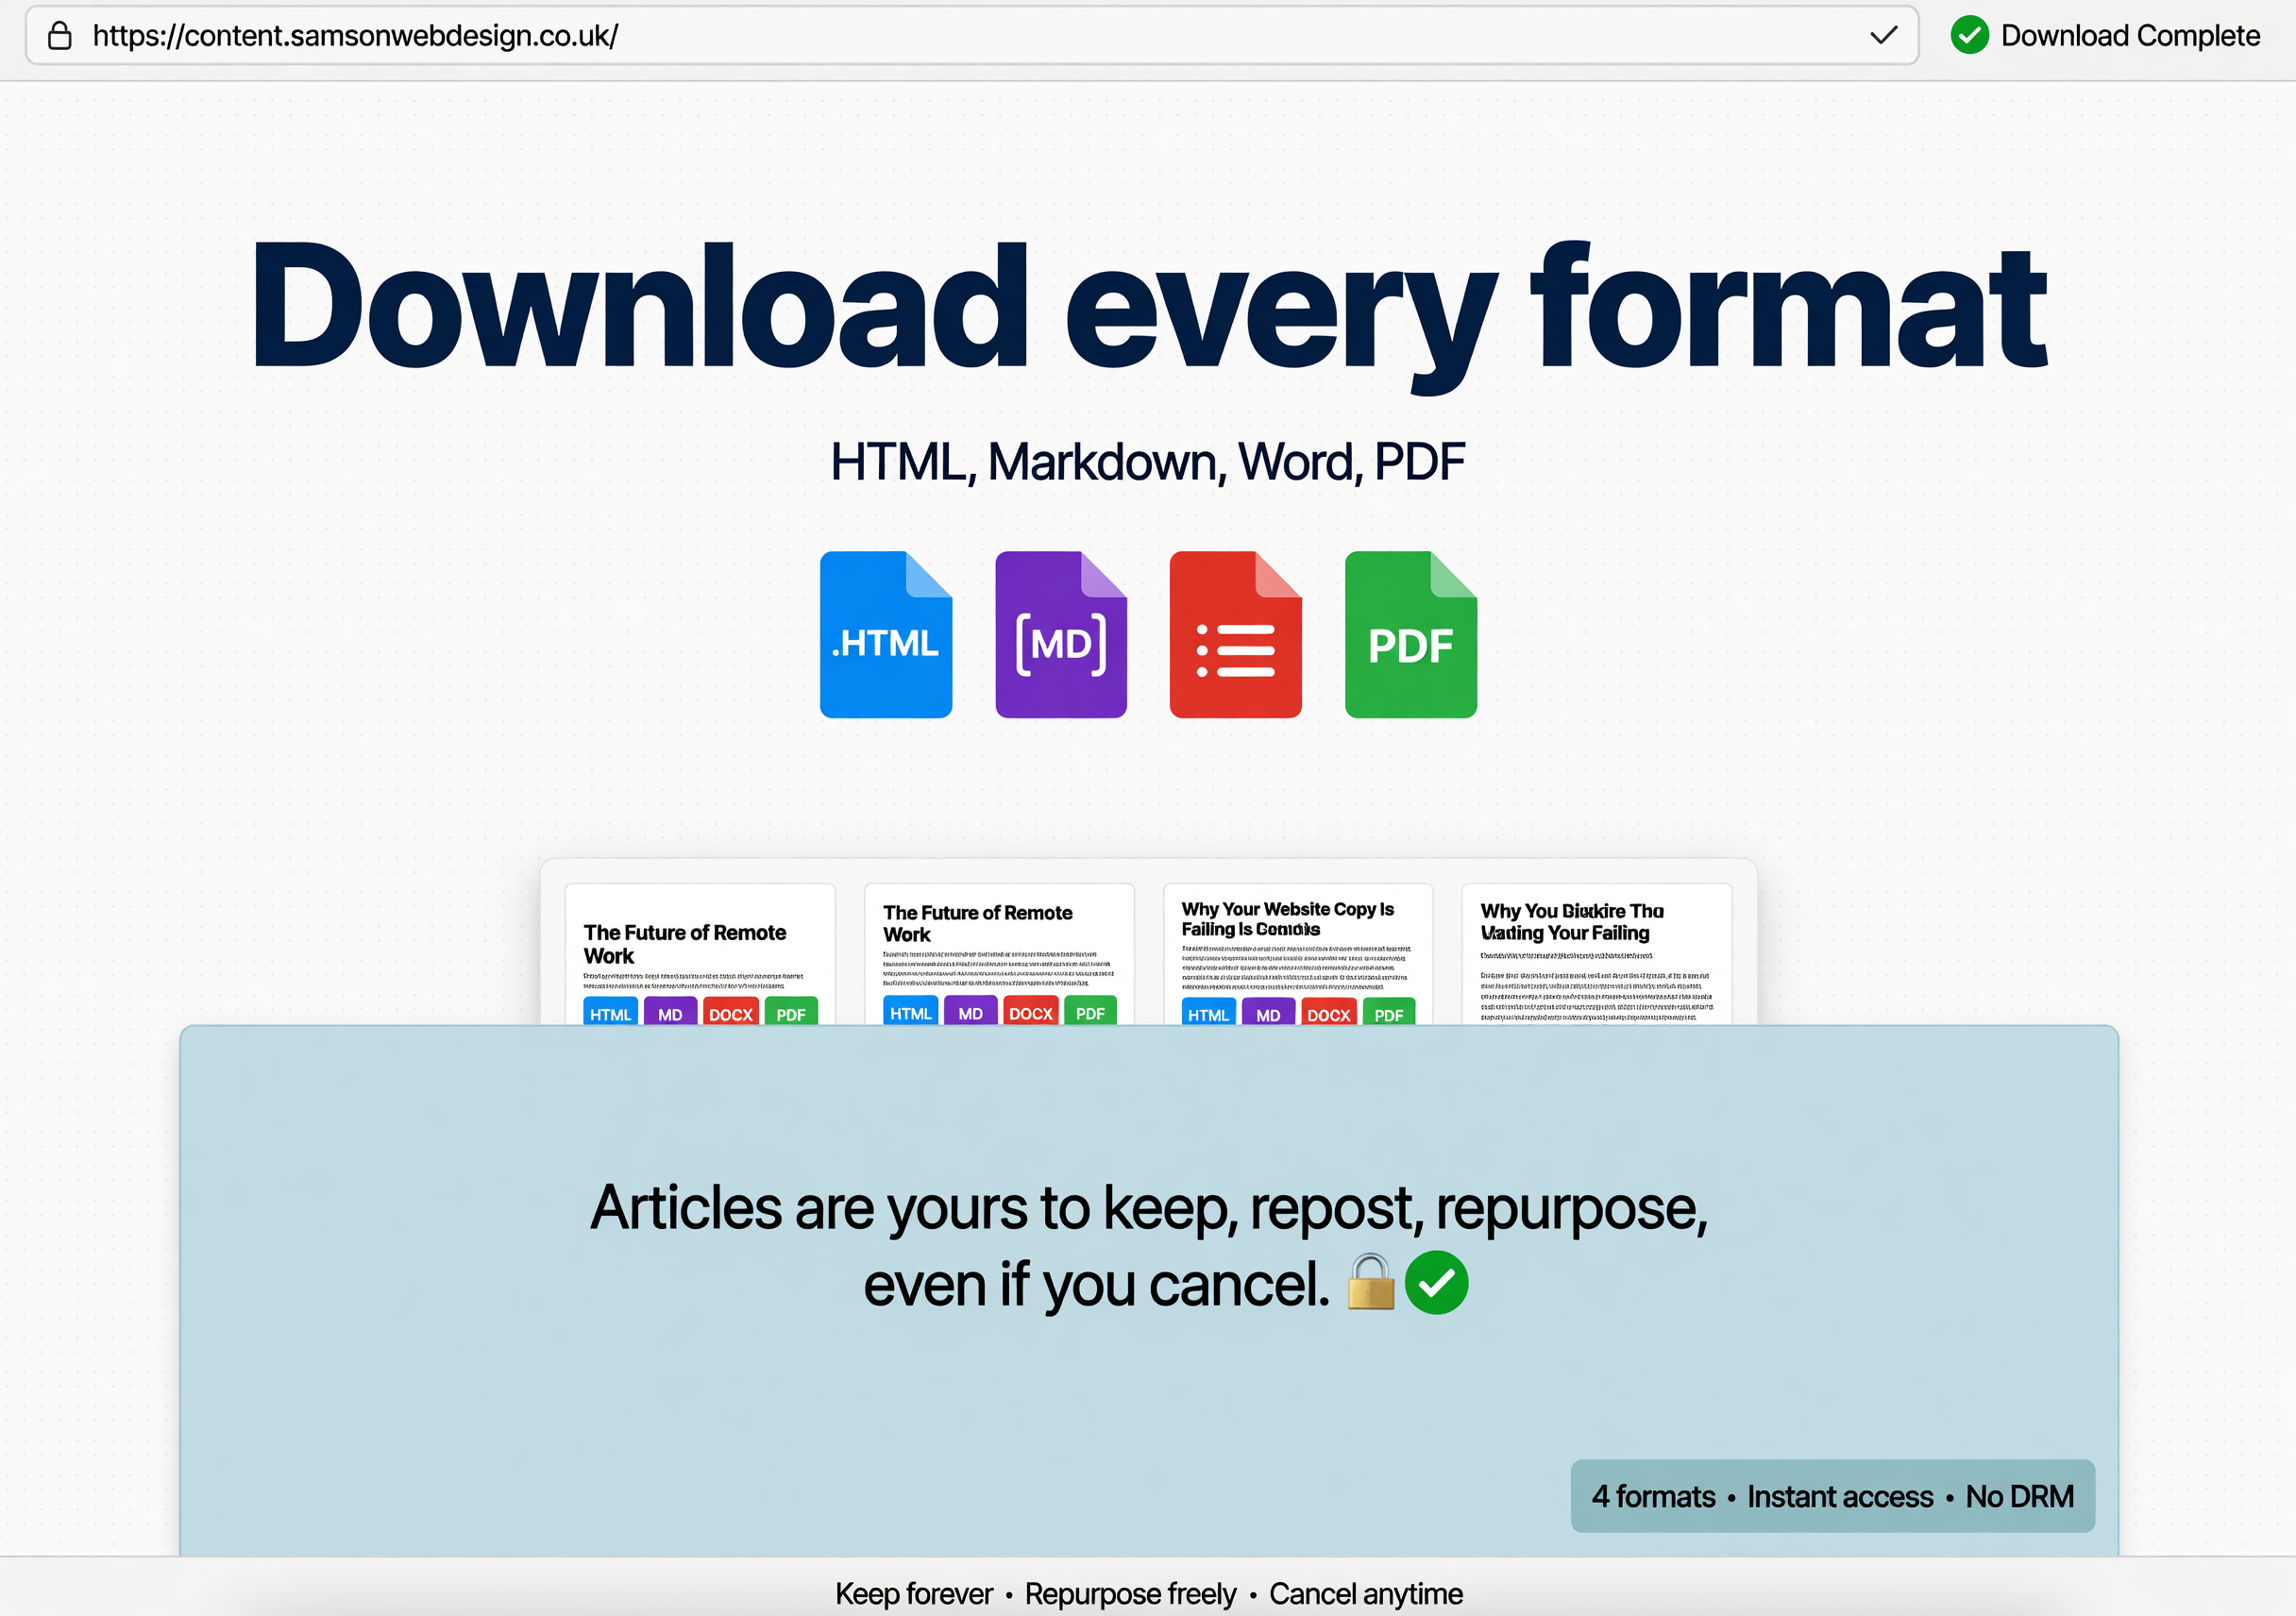
HTML, Markdown, Word, PDF. Articles are yours to keep, repost, repurpose, even if you cancel.
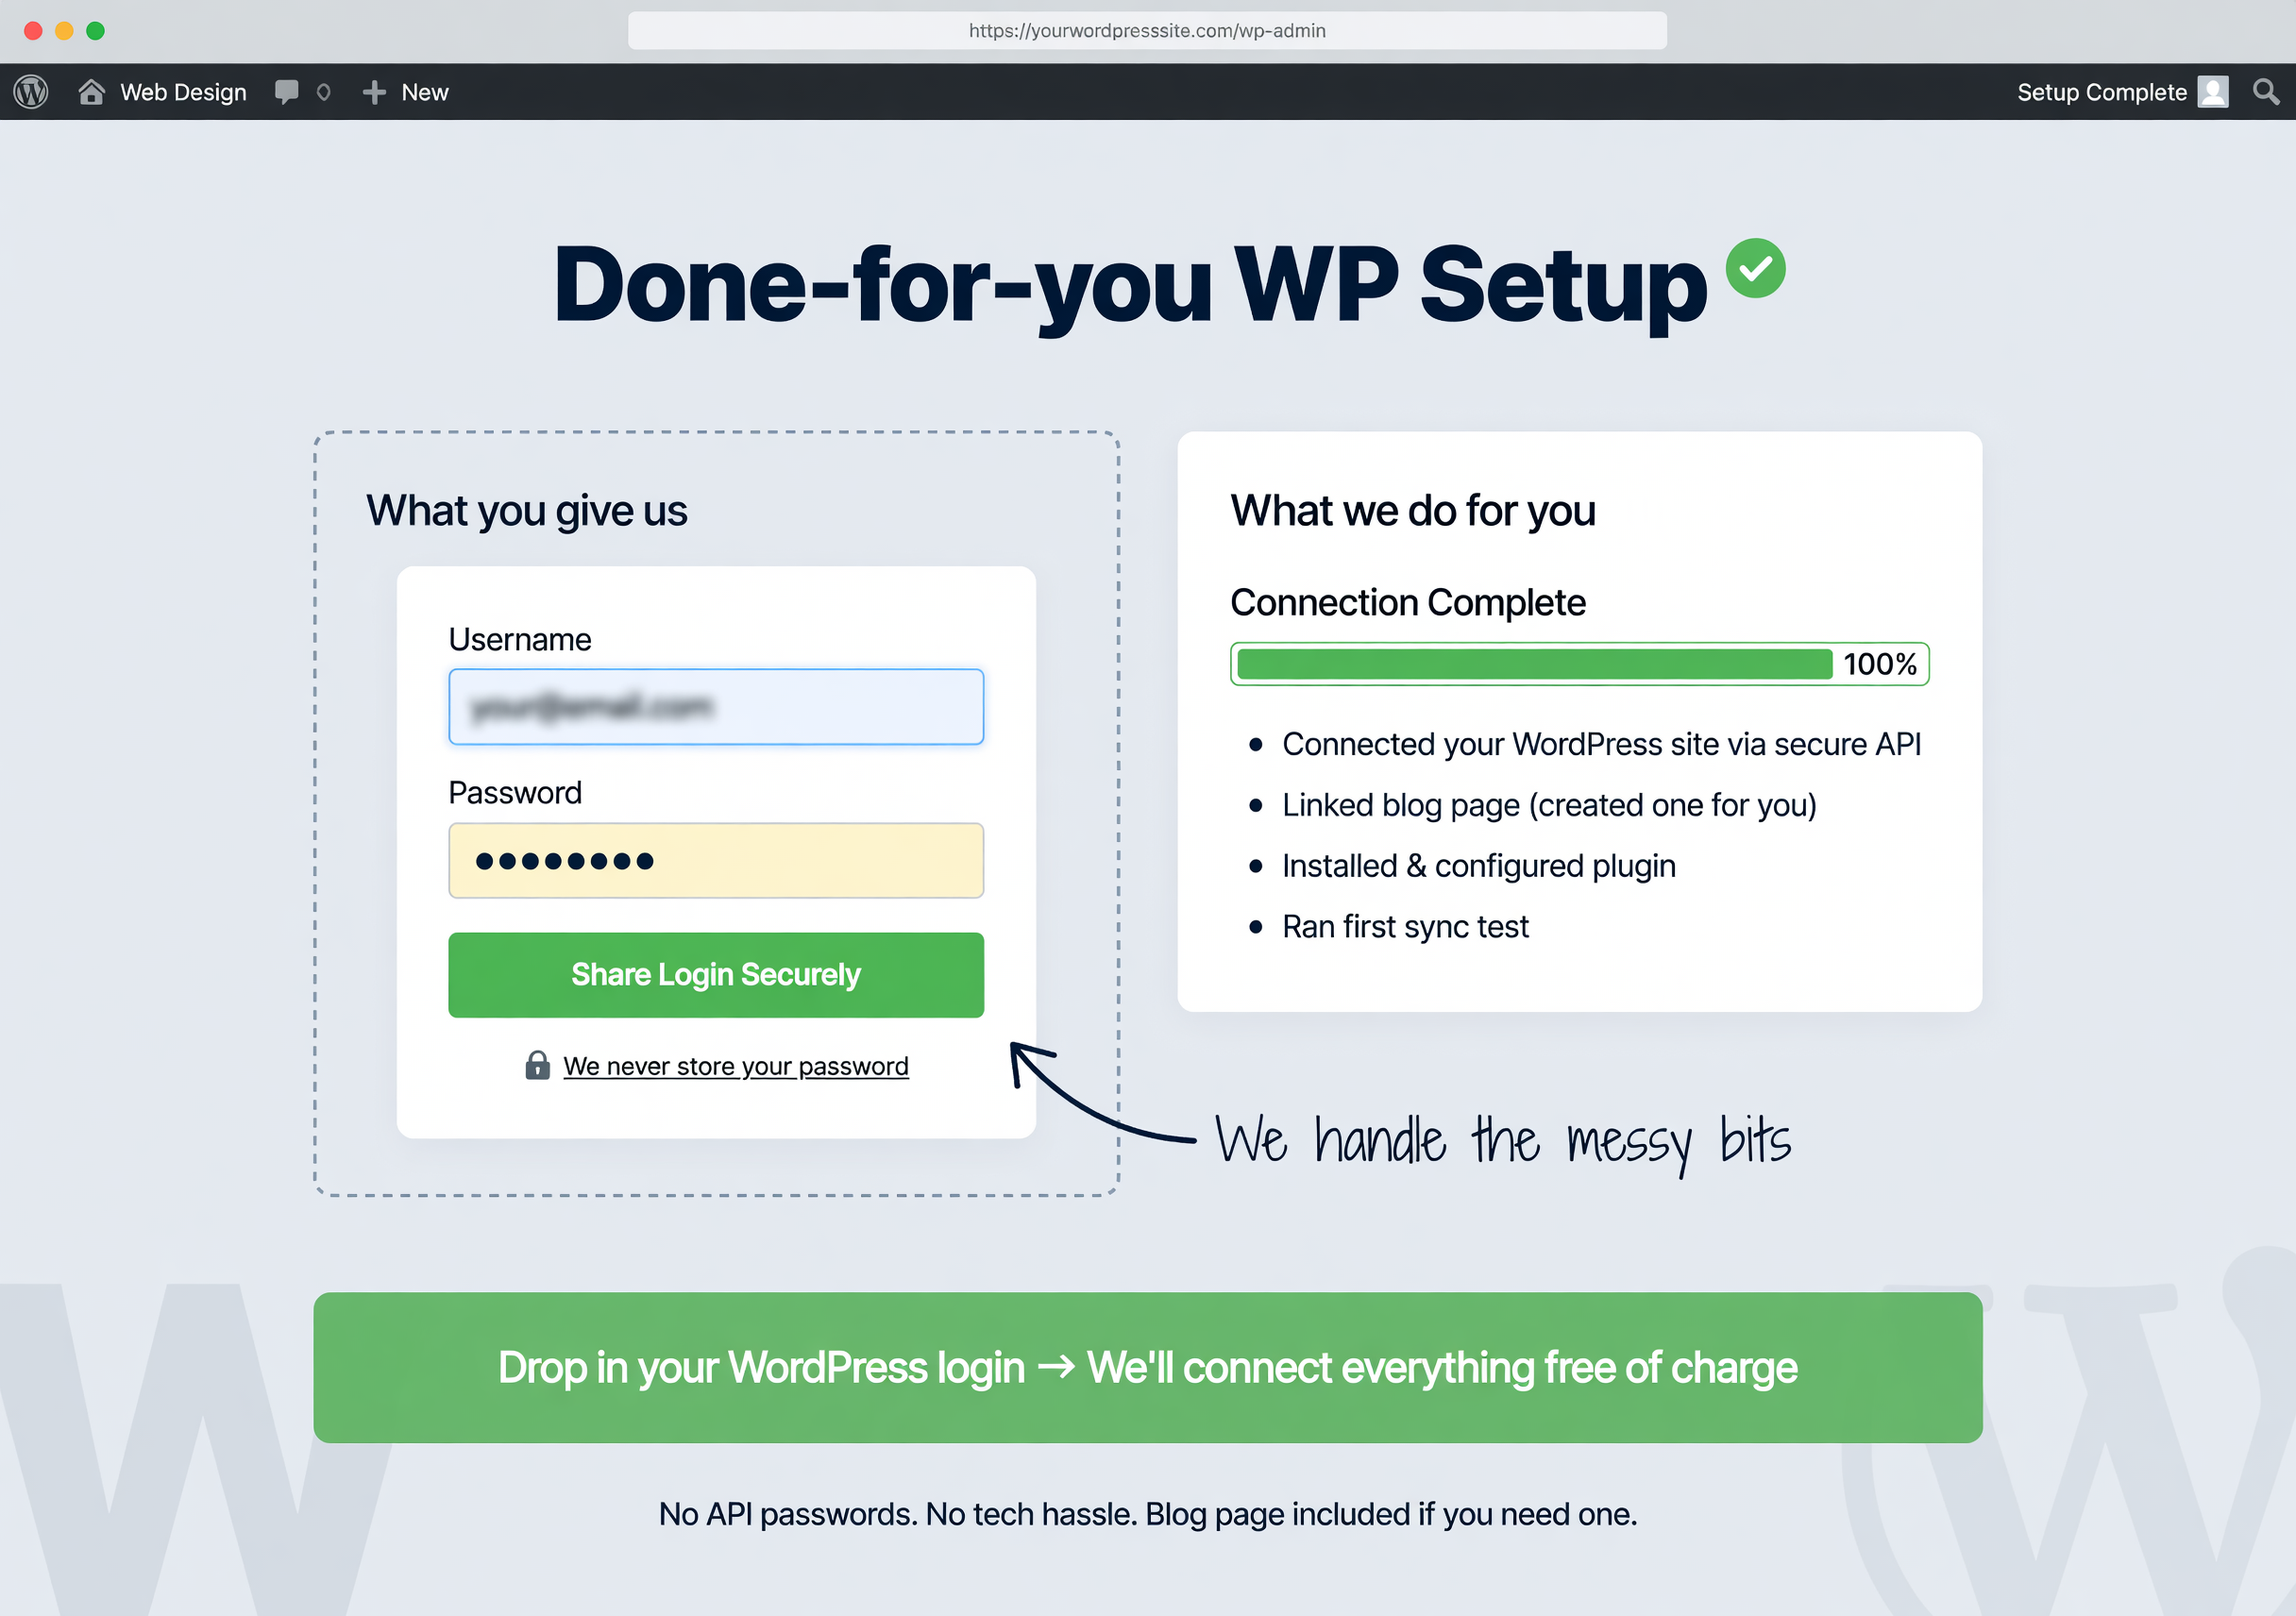
Don't want to mess with API passwords? Drop in your WordPress login and we'll connect your site for you, free of charge. Same for the blog page itself if you don't have one yet.
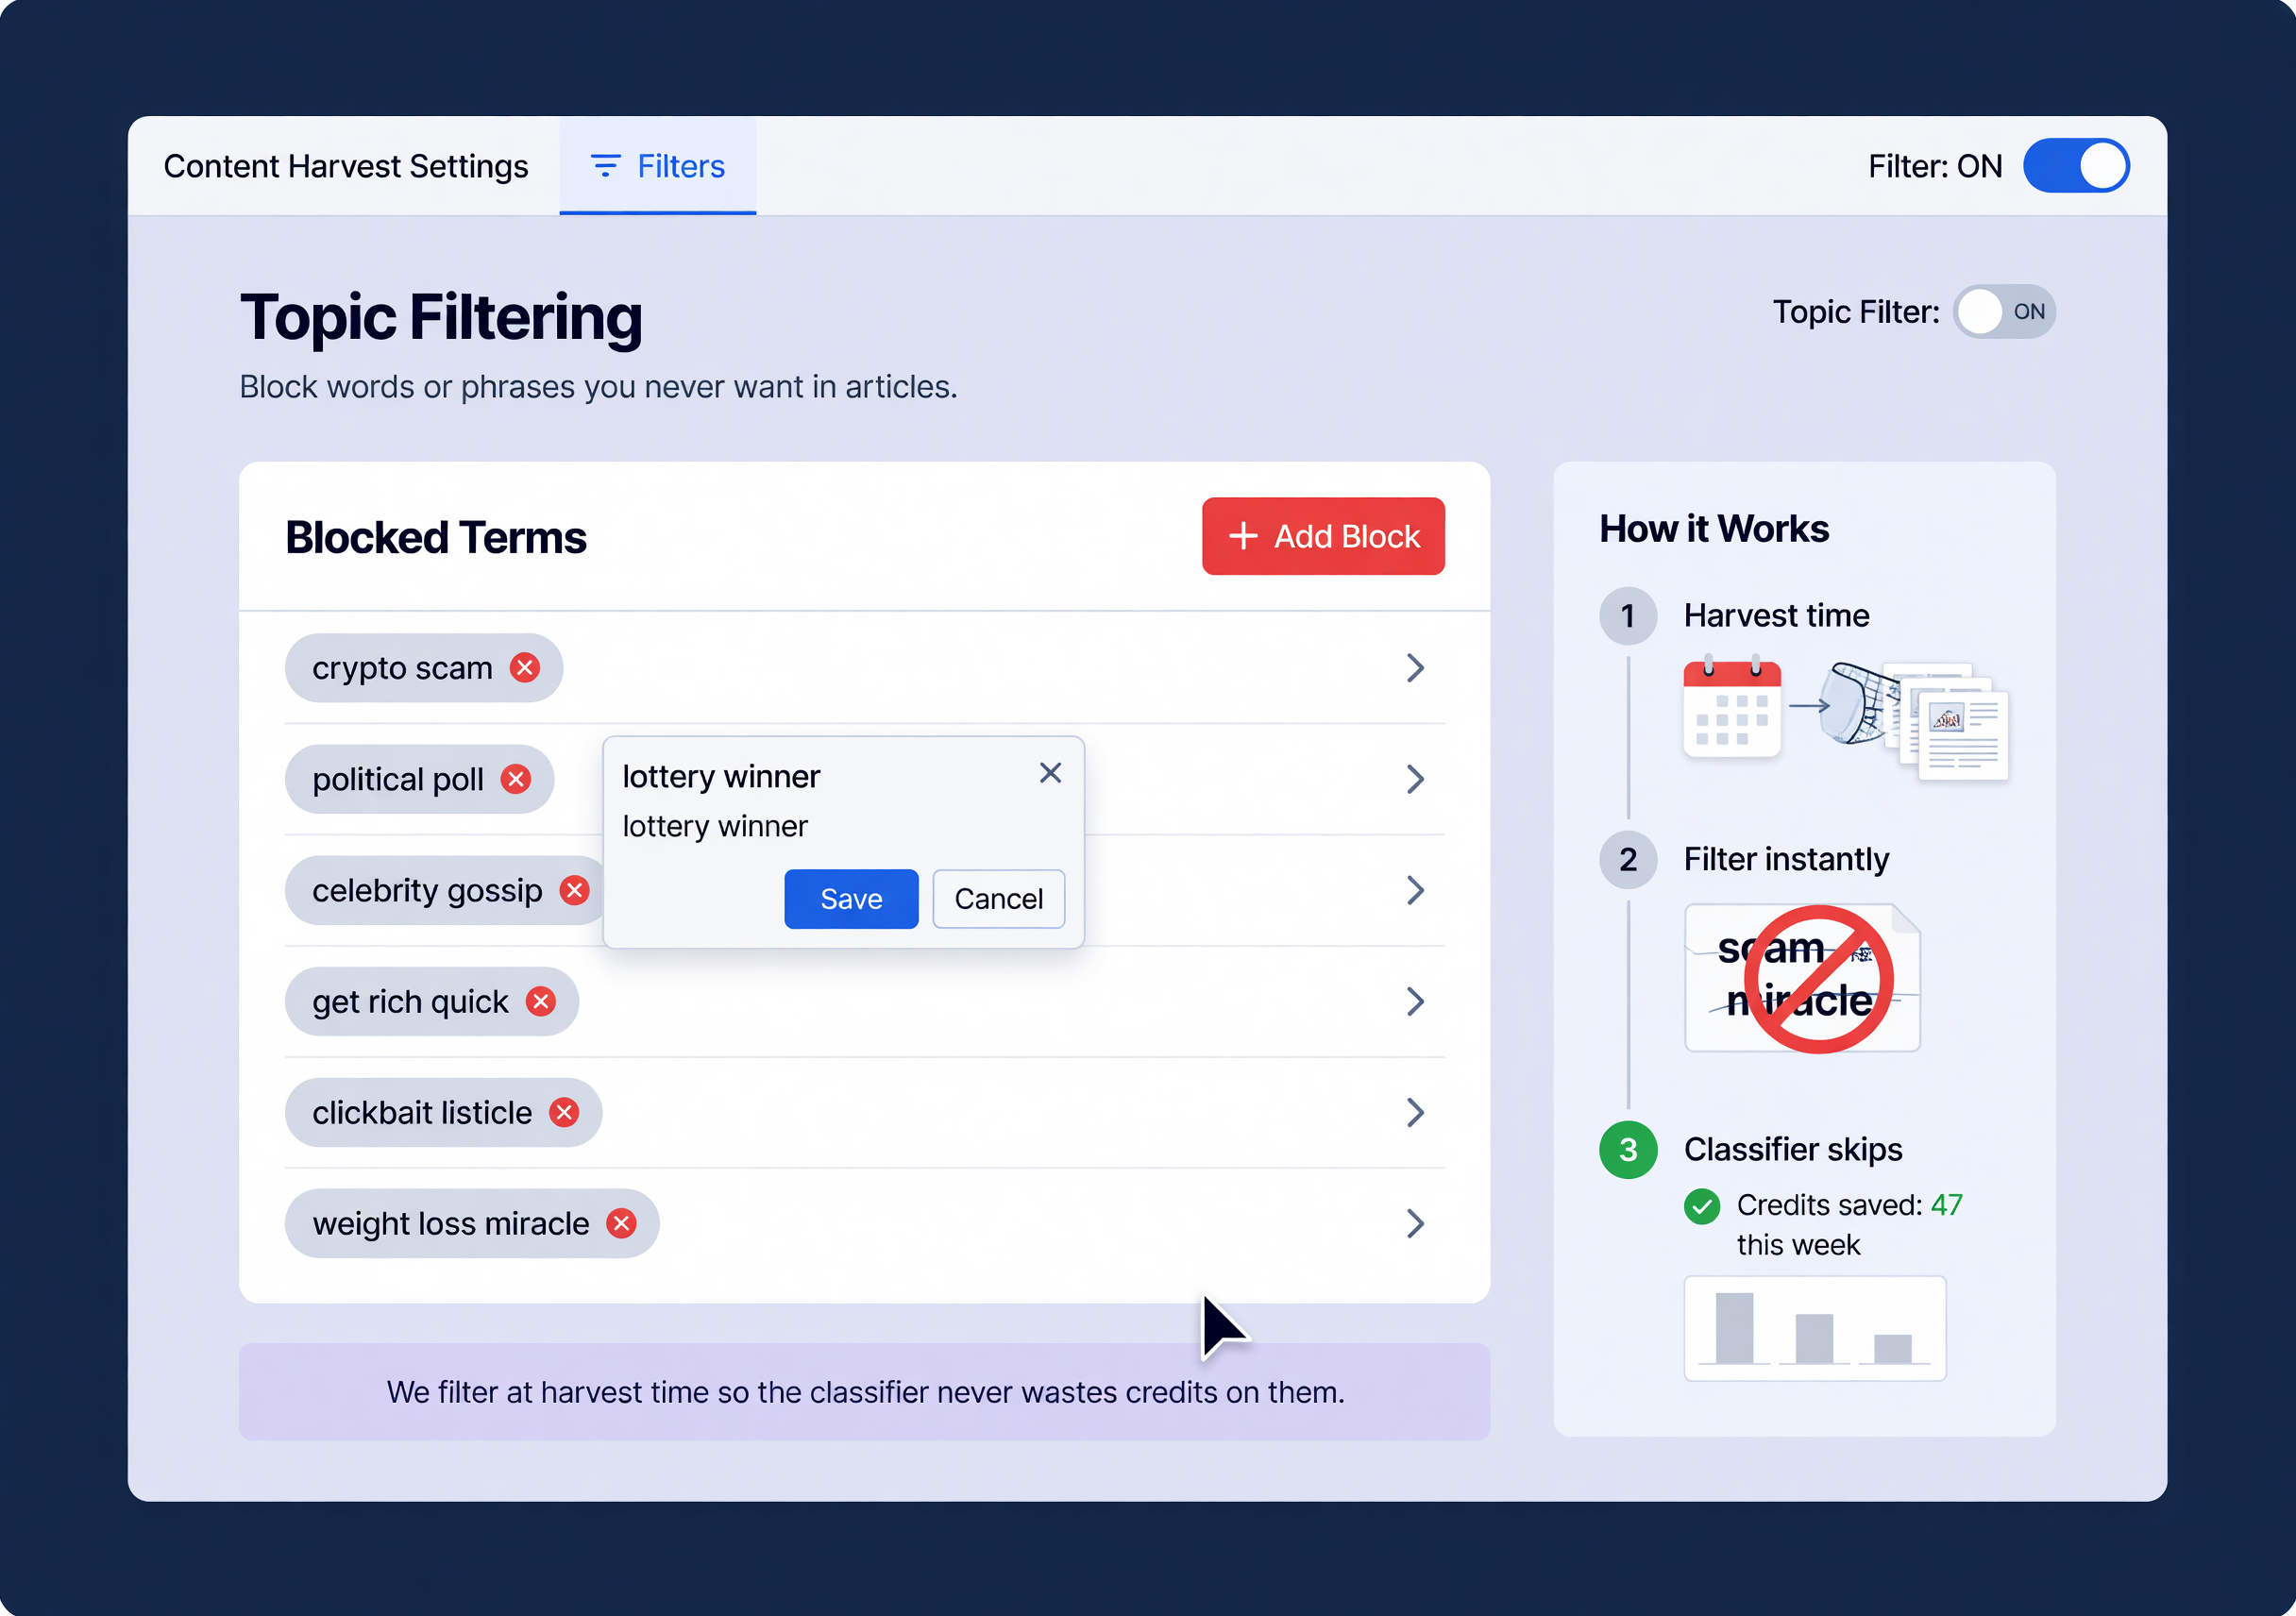
Block words or phrases you never want in articles. We filter at harvest time so the classifier never wastes credits on them.
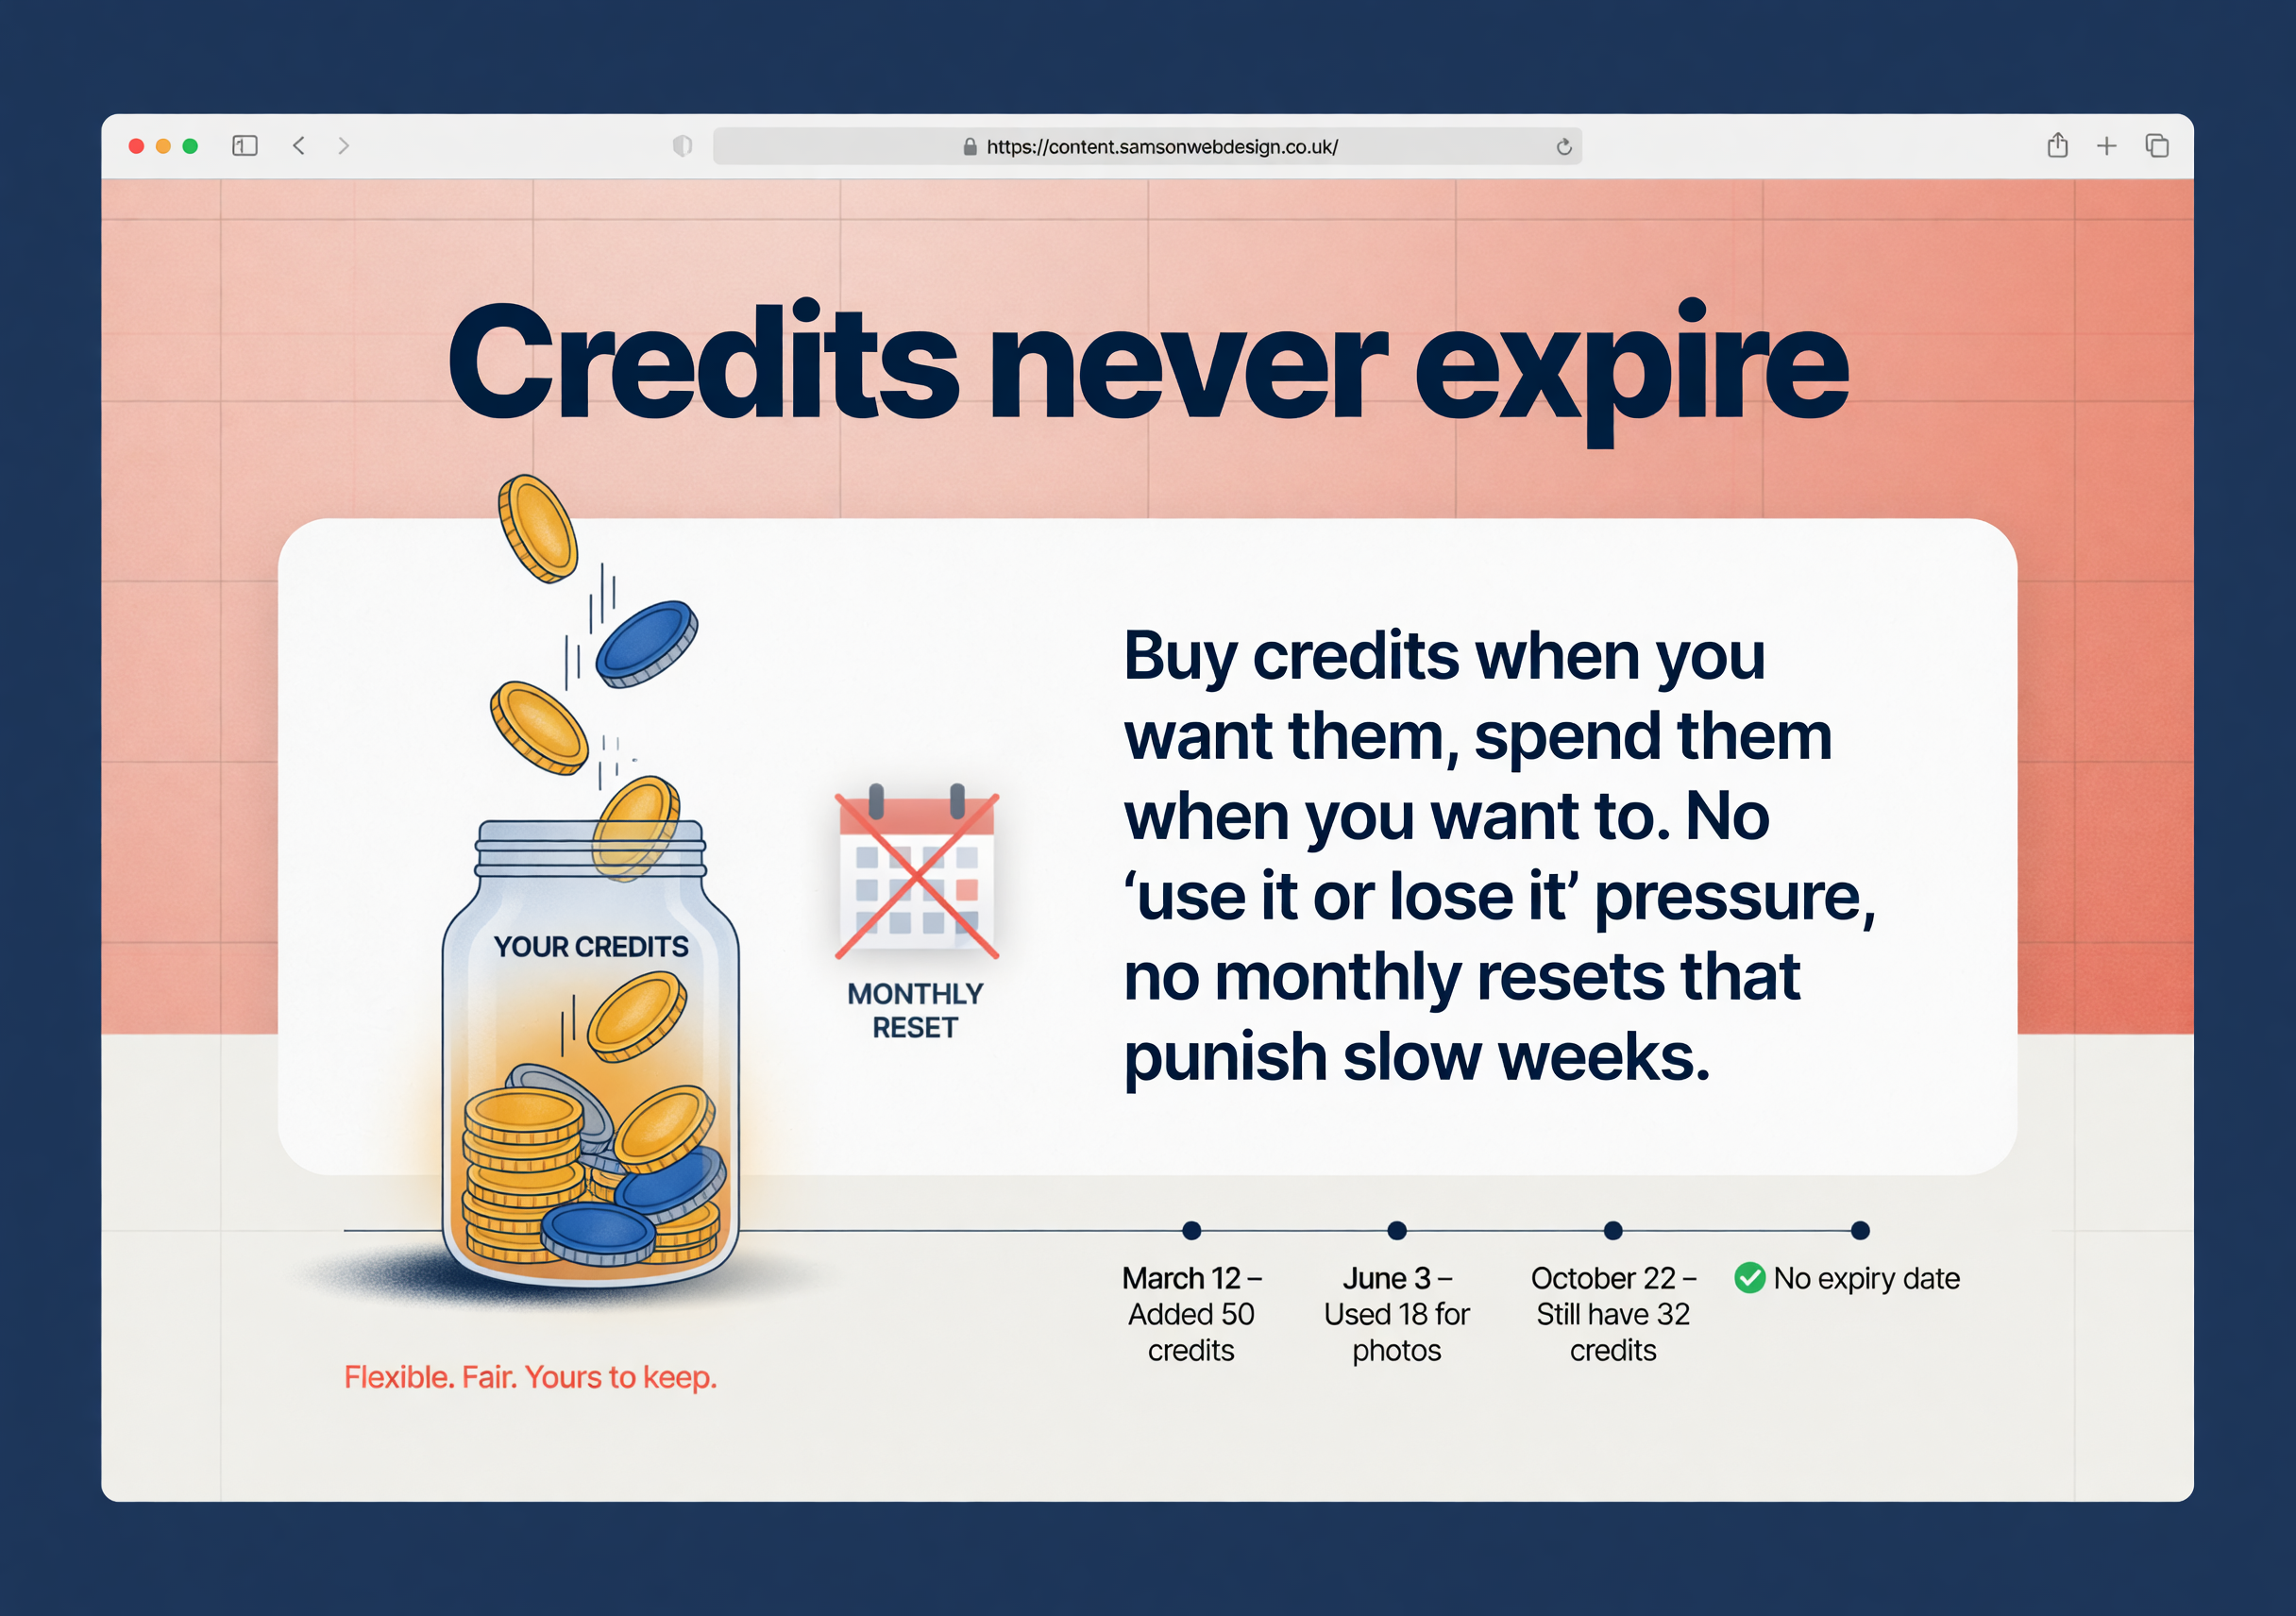
Buy credits when you want them, spend them when you want to. No "use it or lose it" pressure, no monthly resets that punish slow weeks.
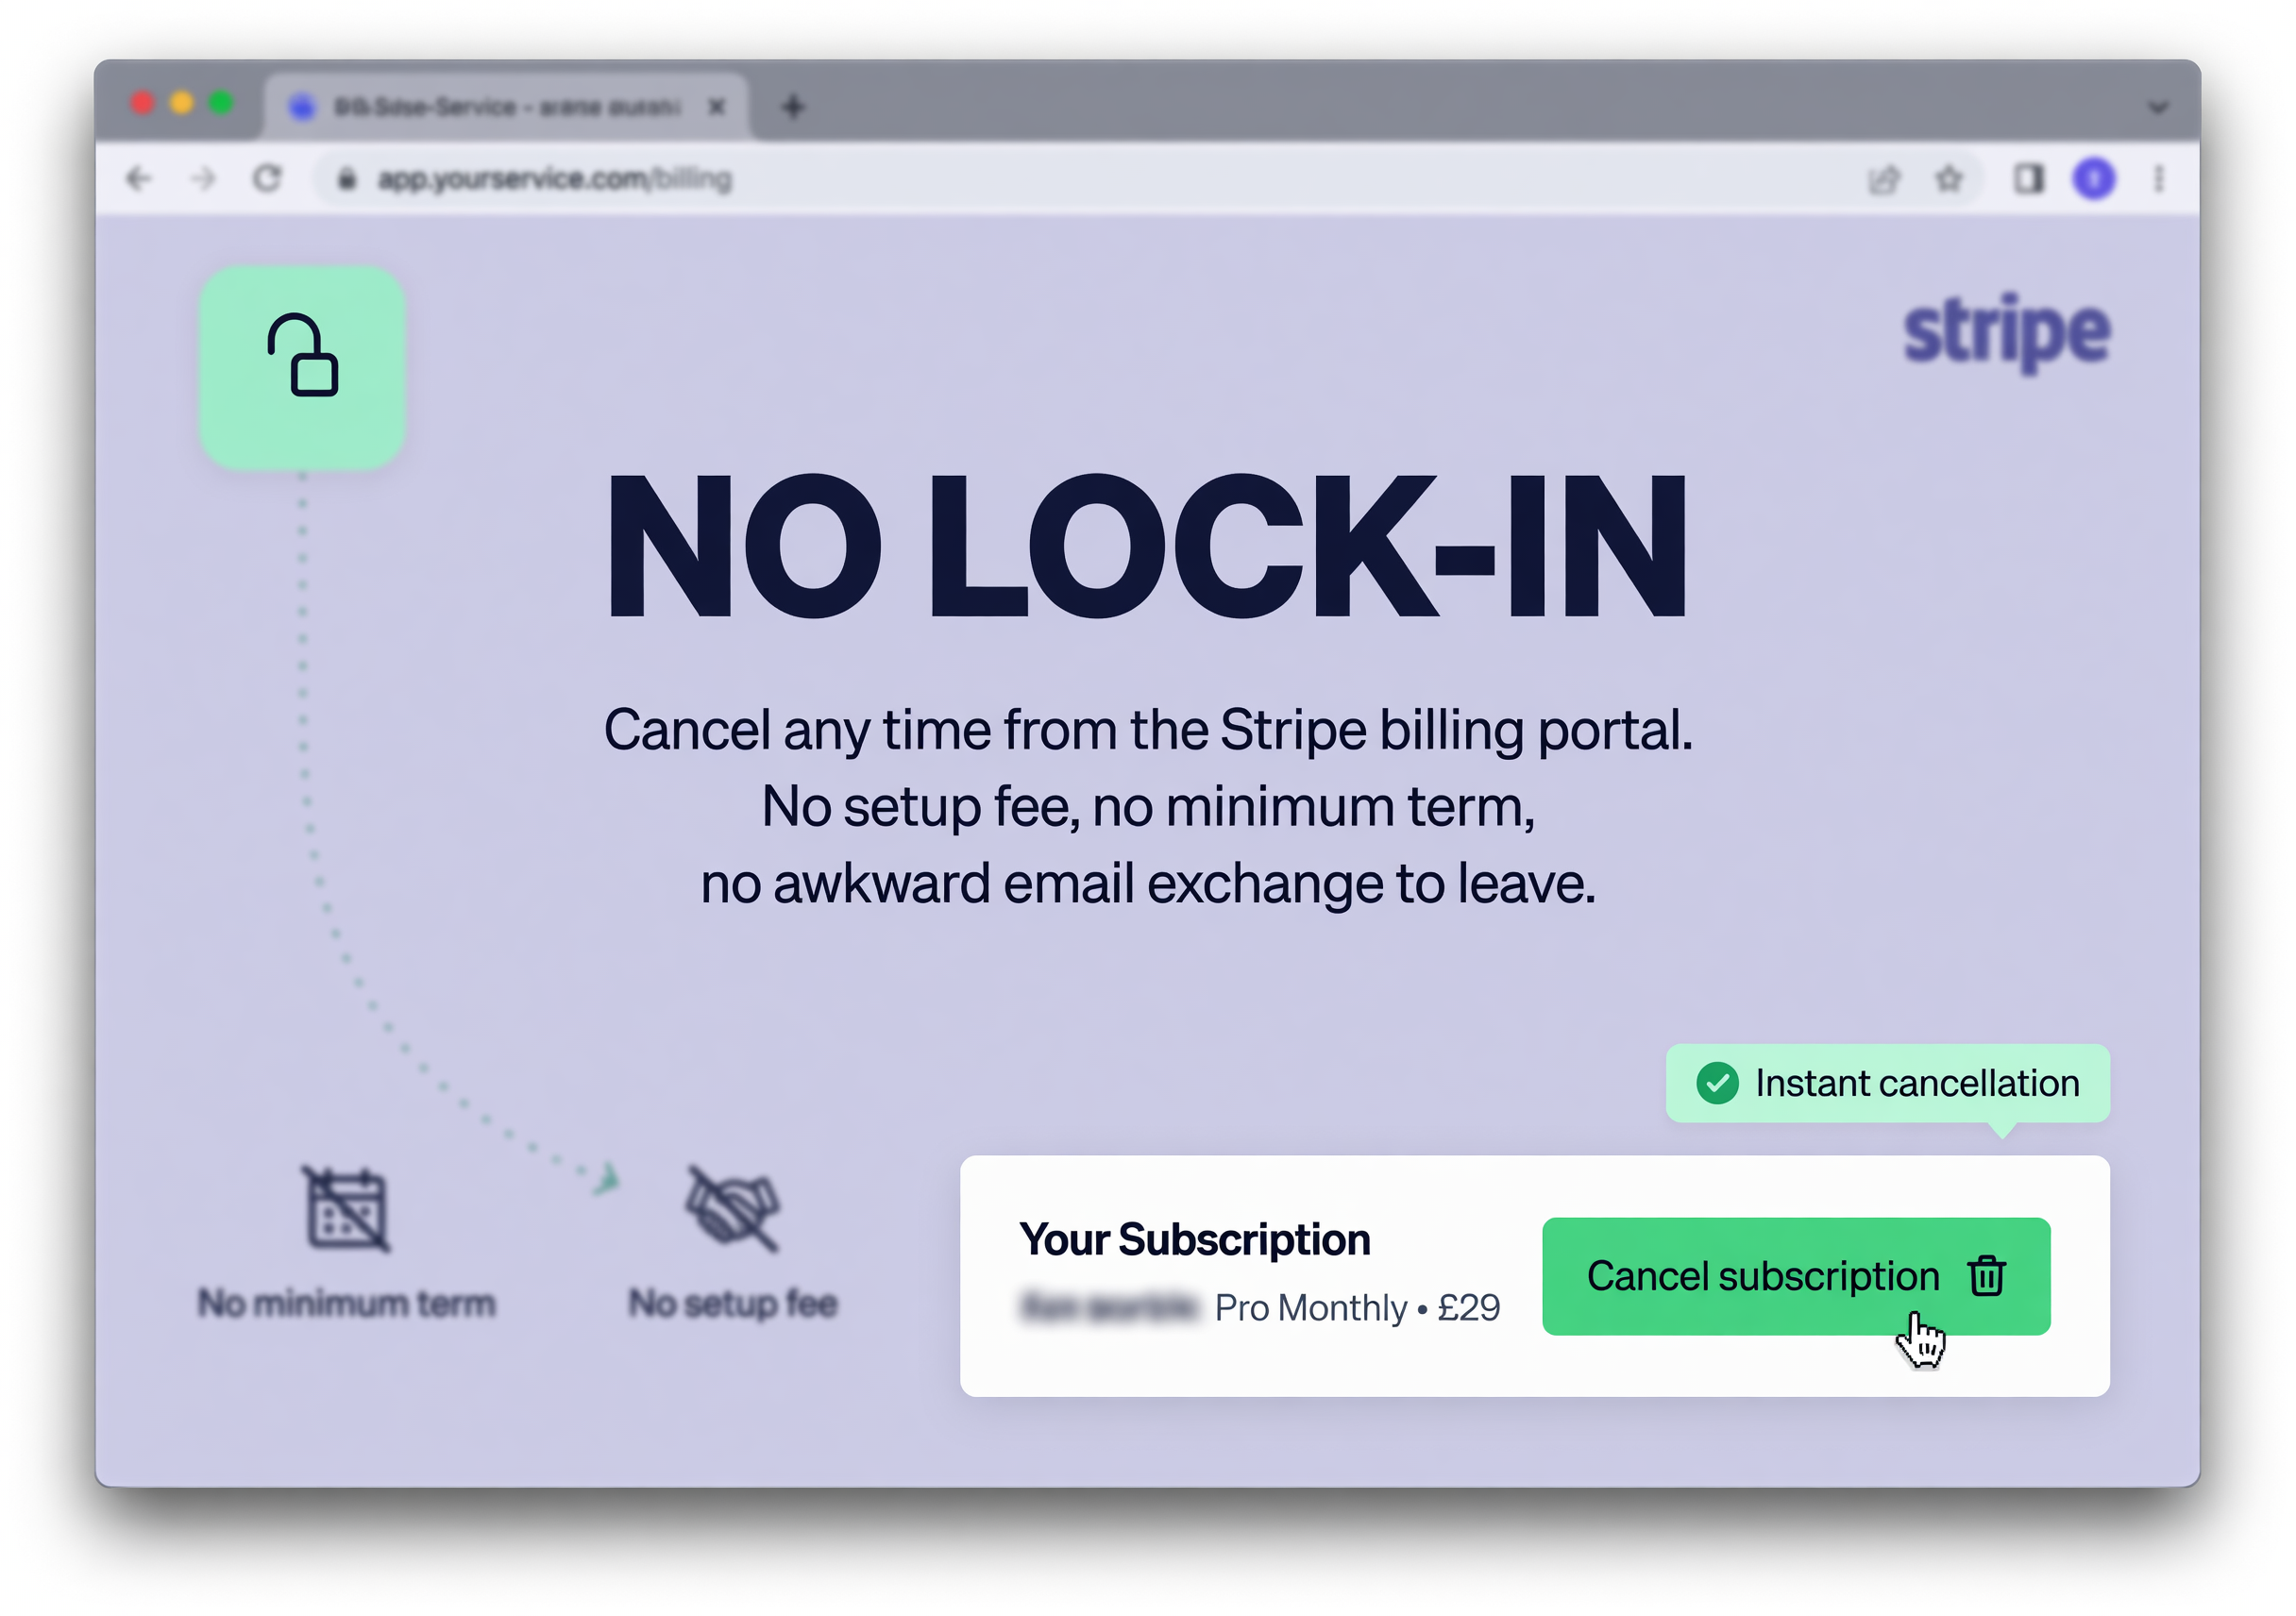
Cancel any time from the Stripe billing portal. No setup fee, no minimum term, no awkward email exchange to leave.
AI-curated article ideas, targeted at your business and customer base
Each article idea comes with a category, a type (Evergreen vs Timely), and is a high fit to your business niche and something your site visitors will be searching for.
Hero image, structured body, ready to publish
Every article gets a hero image generated in your chosen style, proper SEO structure, and download links for all major formats. Published automatically for you too!
Try it without paying a penny
3 fully-written articles, in your voice, on us. See if it's worth it before you spend anything. No card, no commitment, no obligation.
Up and running in under 2 minutes
From URL submitted to first article written, about as long as your morning coffee.
Drop in your URL
We analyse your site, find your real competitors, and surface a personalised content plan: categories, voice, image style.
Use your 3 free articles
We've handed you 3 free credits. Pick three ideas from the AI-curated queue and watch the first article appear in the portal.
Connect WordPress
Connect it yourself in 2 minutes, or drop us your admin login and we'll set it up for you. Both routes are free.
Flip on Auto (or stay manual)
Set your cadence, choose Auto and walk away, or keep Manual and pick ideas yourself. Either way, articles keep coming.
Try it without paying a penny
3 fully-written articles, in your voice, on us. See if it's worth it before you spend anything. No card, no commitment, no obligation.
Pay per article, the more you publish, the cheaper they become
All prices include VAT. Volume discount applies to credit packs AND monthly subscriptions, the more you commit to, the cheaper each article gets.
See your price live as you slide
In the portal you drag a slider, the tier you're in lights up, and the total updates in real time. Inc-VAT and ex-VAT toggle on demand.
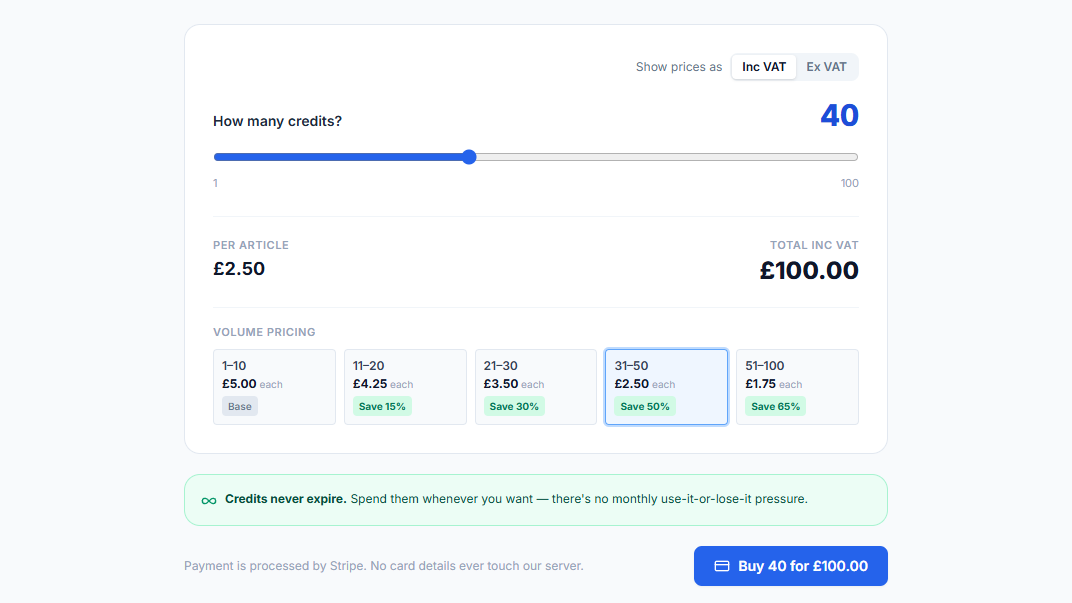
Credits never expire
Buy 100 today, spend them over a year. No monthly reset, no "use them or lose them".
Cancel any time
No minimum term, no setup fee. Manage everything from the Stripe billing portal yourself.
Rewrites on us
Don't love an article? Click Rewrite. Don't love the image? Click Regenerate. Up to 3 of each per article, at no extra cost.
Already convinced? Claim your 3 free articles and decide after you've seen the quality.
Truly autonomous, no monthly button-clicks
Most "AI content" tools dump articles on a schedule whether you need them or not. We only act when your runway runs low.
We watch your queue. You don't.
- Every day at 06:00 UTC we count how many posts are scheduled ahead on your WordPress.
- If you've got more than 1 week of runway, we leave you alone, no credits burned for the sake of it.
- If runway drops below 1 week, we harvest fresh ideas, write enough articles to top you back up to around 2 weeks, and schedule them at your cadence.
- Manual writes (yours) and Auto writes (ours) both extend the runway. Picking a few articles by hand just delays the next auto run. Nothing gets double-spent.
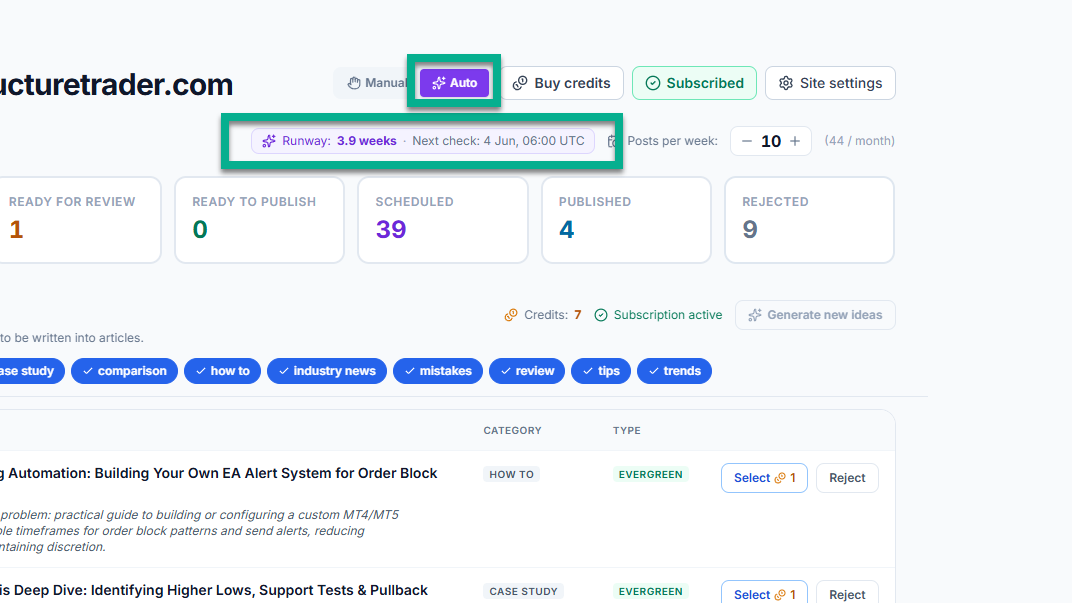
Questions worth answering up-front
Try it, judge it, decide
Drop your URL in. We'll write you 3 articles for FREE. We know you'll love them but there's no commitment to get more, you can just walk away.